Monday, October 29, 2012

Big Eyed Paper People

Third grade is still on their art history journey.  We were talking about the Tell Asmar figures found in Mesopotamia, and how they've all got really big eyes and folded hands.  I have them guess what purpose these stone figures served (they come up with some really imaginative answers) before I tell them that no one is really sure what their purpose is, and why their eyes are so big.  Are they all knowing? Watching out??? 
Then we use paper and paper folding techniques to make our own:

A partial group shot.


They have to use all seven ways of attaching paper in their sculpture.

I let them choose their base color from a multi-cultural paper assortment, we write our names along the bottom edge of the paper and glue it into a paper tube shape.  I then show them how to score paper, make springs, spirals, tab-n-slit, fringe, paper loops and cat stairs.  We also get out the "fun" scissors the second or third time we work on them.


They must have oversized, popping-out eyes, but other than that, they can make whatever type of person they want.  I hang these up using clothespins on a monofilament line right outside of the art room for the entire school year.  They really brighten up our halls, and the students always love to see their work up!


I especially enjoy how varied and different the sculptures always are.  The parimeters aren't narrow, but it's still amazing how different they all are, just like all the students in my classroom!

Friday, October 26, 2012

Color Mixing in Kindergarten

I love this project.  My love for this project really knows no bounds, as they are always stunning:


They are always different and beautiful. 

This student's black is a little gray, but it's still beautiful.

What's not to love here?


It's a little two day project I came up with years ago.  Students start with black tempera blocks and 12 x 18 paper. We paint a U shape together, close the U shape with a line. We then add a horizontal line underneath, add two little lines to connect them. Next we paint the first letter of each child in the class (I tell them which letter, they find space for it on their papers).  So this is what they look like on day one:


These dry, and when they come back next time, I give them yellow (only if I see their paint-brush-horns-like-a-unicorns) and they paint two spots yellow.  Then they get red and paint two spots red.  Then we learn the CORRECT way to rinse and dry our brushes so we can get blue and paint two spots blue.  Then we MIX a little yellow and blue to make green. . . you get the idea.  We make orange, but then I give them pink and turquoise to make a prettier violet.  I do limit (ie, take away the paint brushes of) those who just want to mix mud, so theirs have a lot more white, but they're all beautiful just the same.  I really like how it's helping them with drawing/painting/writing their letters AND it's a beautiful abstract-looking piece of artwork at the end.  A few more, just because they're so pretty:

This the finished one of the middle black and white group
from just above.


I hope if you try this in your classroom, you have just as much success as I always have.  Keep a few color-mixing books on hand just in case you have extra time at the end of Day 2.  I use Little Blue and Little Yellow or Mouse Paint.  Happy Kindergarten Color Mixing!

Thursday, October 25, 2012

Gyotaku!

It's gyotaku time in my art room!  Sixth graders watched this video and wrote "Gyotaku is the ancient Japanese art of fish printing" in their Asian Art Books.  We use rubber fish for less ewwwww factor and make our own chops.

Students use tempera block paint,
and can do whatever colors they choose.

This is our biggest fish

The chop is just made with sticky-back foam
and matboard scraps.  It's printed
with red marker.

The biggest problem I have is students want to "fix" their prints by painting over anything they perceive as a mistake.  Grrrr!  This probably means we need to do more printing to understand what printing is all about!
While I have several more Japanese lessons I could do, we're moving on to China later this week/early next week.  I'm thinking of making brush rests out of clay first to help us with our Chinese artwork.

Wednesday, October 17, 2012

Diggin' Ditches

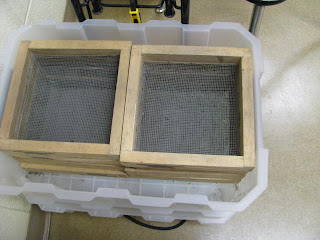
OK, so not really ditches, but third grade's been digging all the same! We've had many discussions about art history, and then we started talking about how do we know this stuff, anyway??? They all know about people who dig up dinosaur bones (paleontologists) and I explained that the people who dig up remnants from people's civilizations are archaeologists.  I reserved the archaeology kit from my local art museum, and it has items like this in it:

Screens for sifting dirt.

Buckets and shovels for digging.
The kit comes with 8 shovels, but only 5 buckets,
so I add some from my classroom.

Brushes for cleaning off findings.

Magnifying glass to look closely-
I actually use some cheap-o ones from
my classroom, I worry about them
dropping them outside.


I set up a dig site outside.
I try to turn in a work request, so someone will come and plow it up for us.  I've used the same dig site for several years (it's convenient) but I think I'm going to move it for next year (to an area that gets some run-off, I think we'll find more interesting things there).

We got a LOT of rain over the weekend, so ignore the wet papers
that blew in there.

Rain made our sign a little wiggly.  It says
"Please DO NOT DISTURB
IMPORTANT ARCHAEOLOGY DIG SITE"
Before we go out and dig, we watch a YouTube video or two of dig sites, I use this one, this one, and sometimes this one.  They're all really short.

We also make books to record and save our findings:
We decorate our covers with tools we'll use
and things we want to find.

A baggie is our first page to keep the treasures
we find.  Five blank pages let us record
our teammates' findings.


Students dig in groups of 3 or 4.  Only one person is in the dig site from a team at a time.  Everyone has a job (and they rotate every couple of minutes).  Someone's digging, someone's holding supplies, someone's helping to sift dirt and look for artifacts. . . it's a fun couple of days (unless it's rainy, and we don't get to go out).  I've done this activity for 10 years or so, and sometimes (when I first started) I'd place things in the dig site for them to find.  But it felt so. . . artificial, so I don't do it anymore, and you know what? Third graders are sooooo very excited with rocks or whatever ("Look!  I bet it's a FOSSIL!")
And this is the closest I hope I ever get to digging ditches!

Tuesday, October 9, 2012

All About Alligators

Second grade was learning all about texture when we did our Lady-With-The-Alligator-Purse project, and I continued the texture theme and threw in a little color mixing with non-fiction alligators.  We reviewed how to make green, mixed our own green and painted 12 x 18 papers green.  We then viewed a Smart Notebook lesson about alligators, focusing on how they really look.  We even watched short video clips from here. If you want the Smart Notebook lesson I made you can download it here.
We wrote facts about alligators in our sketchbooks, and practiced drawing alligators.


I then gave them small stickers (that were a donation from a sign company, but masking tape would work too) and had them cut them up, put them on one section of their green paper and paint blue on top (a resist technique).

With the stickers still on.

After it's dry, we pull the sticker/tape off carefully.

 After their painting was done, they drew a large alligator on a seperate 12 x 18 white paper in pencil.  We then talked about how the alligators we saw in photographs and on the videos were more of a brownish/grayish green.  So, when we mixed our green for our alligators, we added the tiniest bit of red (discussing compliments, and how they brown out a color).  After our alligators dried, we added texture with small printing plates I made out of 2 x 3" matboard and sticky-back foam.


We also used tiny brushes to add our details like eyes, teeth, etc.

The only thing left to do was to cut out our alligators and glue them to their swampy-water backgrounds:


This alligator is giving her baby a ride
like we saw in the video.
Another baby on mama's back.

Sideways once again! Says "alligators are dangerous.
I like alligators."

Babies on backs was a popular theme.

And a shot of part of the display in the hallway:


Friday, October 5, 2012

Oh YES, Japanese Scrolls!


Front

Back


I posted the beginnings of these in an earlier post, and we're finishing up now.  I really, really like these.  I gave the students several options for themes: Nature, People, Animals or Dreams.  We looked at several Japanese scroll paintings, but I was a little loose in their subject matter (one student did a huge llama). They drew with pencil, traced with ultra-fine Sharpie, and colored with watercolor pencils and metallic colored pencils. Water was painted over our watercolor pencil to give it a painty look (if they colored smoothly).

Panda in a bamboo forest.

Back of panda in a bamboo forest

A close up, I love how she drew her horse (all by herself).

Another close-up


This is sixth grade work.  I haven't done this project exactly like this before, but I thought 'hey, you've taught 13 years, just wing it when you have them put them together.'  Bad bad bad idea.  First of all, it was a Wednesday, so my classes were all 10 minutes shorter (students come an hour late on Wednesdays) and I hadn't really thought it all through, I didn't have them do it along with me. . .it was awful.  After I got them all in the drying rack (most only partially done) I realized--none of them had their names on them anymore, as we'd glued  the sides with our names together!  The next class I had them do it all along with me and it went so very much better.

Of course, a sideways shot.

She worked really hard on her panda.

This one is unfinished, but I LOVE it.

Close-up of the lovable one.

Another close-up [because I couldn't resist].

The back--she didn't rinse her marbelized paper very well,
so the starch kind of pooled.
Our drawings are 18 x 8", our marbelized papers are 12 x 18.  We glued our drawings to the middle of the back of our marbelized papers, then carefully folded our marbelized papers just to the edge of our drawings.  Strings were added BEFORE we glued the folded edge to hang them.


I linked it my earlier post, but I don't mind doing it again to give credit for our beautiful marbelized papers.  I got the recipe here.
Next week we'll begin the process of figuring out whos-is-whos in my other sixth grade class, and we'll write our names on them!

Pin It