We've been back to school for about two weeks now. I decided to change things up with my fourth grades and start the year with Ancient Crete and Greece. I made a Smart Notebook presentation with all these little video clips, and kind of stumbled through it with my first group (it felt kind of disjointed or something?). I was really hitting my stride with my introductions with the second group. . . and then the network went down. Which meant no internet. No showing video clips or external links. My whole introduction was ruined! Right in front of the class! So, I decided to act out the links. Like some weird improv, I danced and galloped and did lots of jazz hands. And sweated. Lots. Did they get the information??? I sure hope so.
And the network stayed down. For two days. Goodbye video'd demonstrations loaded onto an external site for sixth grade, hello demonstrating over and over.
A class would come in and I'd start with whatever was planned and then realize 'I can't show that/do that.' It was like someone had cut off an arm or something.
But somehow we survived. The internet connection was restored and we kept on keepin' on.
I'm not AT ALL saying the Greece Smart Notebook lesson is a great one (at this point I'm not even sure it's good), but if you're interested, let me know and I'll drop it in my Smart Notebook files for you to use. And maybe your internet will work, all day.
Showing posts with label Technology. Show all posts
Showing posts with label Technology. Show all posts
Thursday, August 31, 2017
Sunday, August 28, 2016
Job Security--If Only I Could Remember!
Here's (one of the many) great things about being an elementary art teacher--it's always someone's first time to ____________. There are always going to be children who've never held scissors, or painted, or used papier mache. This is job security! In our technology/digital world art teachers are needed more than ever! Fine motor skills are important and creativity is vital! Now, if only I could remember this when I start lessons at the beginning of the year. Yesterday I started Emily Carr landscape paintings with fourth grade and didn't demonstrate painting techniques at all! What is this? My first day?! Needless to say, I demo'd the heck out of some painting with my fourth graders today, and wrote DEMO in my plan book for fourth grade on Monday.
I also made a sketchbook measurement how to video for sixth grade (probably more for me and my remembering):
I also made a sketchbook measurement how to video for sixth grade (probably more for me and my remembering):
What would really be great would be to show this video to my classes on my Smartboard, but (GASP!) my Smartboard is not recognizing my computer these days. Even with our tech person working on it, it's not happening. On the plus side, our district started using Schoology this year, and my lack-of-Smartboard-having means I'm dropping things into Schoology and using that resource the second week of school. But THAT means students have to carry their chromebooks to art AND I have to remember to email teachers to tell them. And we all know remembering isn't always my strongest suit!
What am I going to be like in 10-15 years? Forgetting to wear pants to school? The older I get, the more I realize that art teachers may deserve the reputation as the kooky ones. Or maybe it's just me.
What am I going to be like in 10-15 years? Forgetting to wear pants to school? The older I get, the more I realize that art teachers may deserve the reputation as the kooky ones. Or maybe it's just me.
Thursday, December 3, 2015
So Many Good Things
So many good things happening lately: my student teacher is rockin' it (way to go, Mr. Hodes!):

I was just elected the elementary division rep for my state art teacher organization (I am feeling so honored/excited/privileged to be in this position and I'm really looking forward to doing my best for the elementary art teachers in my state).
Mr. Onehappyartteacher and I are figuring out ways to keep our two year old in bed allllllll night (and early morning). Yay for sleep!!!!
Also, I was contacted by Scholastic Instructor Magazine about writing up the Klee + Math lesson. As I've said multiple times, it is totally not my lesson, but Mary Franco (who came up with the lesson) gave her permission for me to write it up (and give her the credit, because she's awesome and totally deserves OODLES of credit), so that should be coming out in the spring sometime.
And my sixth graders are working on a quick-and-fun clay project. We've been studying the art and culture of India. As anyone who's been working in a school for more that about 10 minutes in December knows, you're either going to fight the Christmas is coming crazy or join it. I'm too tired to fight (see above with the whole two-year-old-not-sleeping-thing), so we're making tiny clay elephants:

I made a video how-to for my students with my new document camera I got at the end of last year through a grant. Because it's still so new to me, I (once again) ended up without sound, so I had to narrate as it played, but it was awesome to be able to replay it multiple times as needed on the Smartboard:
The plan after they've all been fired is to do a crayon resist with black block tempera over to mimic the painted elephants in Indian festivals and celebrations. I'll try and post an update after we're done, but I'm also giving Mr. Hodes full reign for the little bit of time he's here.
Enjoy the Christmas crazy while it lasts, friends, the January/February blahs aren't that far off!
Monday, October 26, 2015
Fifth Grade and Andy Warhol
I know I probably say this too much, but I'm really loving these!!!!

Here's the backstory to this assignment--our district went to one-to-one electronic devices this year (all students have chromebooks), and while I'd dabbled in Google Classroom last year, I wanted to get better at it this year. This project is similar to one I did many years ago in a different district, except last time I took, edited and printed all the student photos (ain't no one got time for that). Here's what I did: I set up a fifth grade Google Classroom and created an assignment using these directions (let's hope you can access them), then as a group we went outside, took photos and went through the directions all together. When students had a black and white high contrast selfie, they turned it in to me through Google Classroom and I printed them out.
While all that was getting accomplished, I gave them each a large, 18 x 24 paper to fold into fourths. We did bleeding tissue on one fourth:

And then a warm painting on one fourth and a cool painting on one fourth (using the block tempera paints):

All of this work gave me time to chase down absent students or students who didn't actually turn it in correctly.
I had decided to have them trace them on clear sheets, and in a stroke of pure luck (maybe genius?) I happened to ask in our main office if we had any boxes of old overhead sheets lying around. The secretary was SO HAPPY to get rid of them. In the store room there were more boxes than I could carry!!!
Students taped the clear overhead sheets to their photos with one strip of masking tape and traced the black with extra fine permanent marker:


Only a few are done for now, but after tracing onto three clear sheets, I use hot glue to attach the tracings to their papers:

The final step was to have the students glue their photo to the remaining/blank rectangle on their paper. I CANNOT WAIT to hang these in the hallway!

Here's the backstory to this assignment--our district went to one-to-one electronic devices this year (all students have chromebooks), and while I'd dabbled in Google Classroom last year, I wanted to get better at it this year. This project is similar to one I did many years ago in a different district, except last time I took, edited and printed all the student photos (ain't no one got time for that). Here's what I did: I set up a fifth grade Google Classroom and created an assignment using these directions (let's hope you can access them), then as a group we went outside, took photos and went through the directions all together. When students had a black and white high contrast selfie, they turned it in to me through Google Classroom and I printed them out.
While all that was getting accomplished, I gave them each a large, 18 x 24 paper to fold into fourths. We did bleeding tissue on one fourth:

And then a warm painting on one fourth and a cool painting on one fourth (using the block tempera paints):

All of this work gave me time to chase down absent students or students who didn't actually turn it in correctly.
I had decided to have them trace them on clear sheets, and in a stroke of pure luck (maybe genius?) I happened to ask in our main office if we had any boxes of old overhead sheets lying around. The secretary was SO HAPPY to get rid of them. In the store room there were more boxes than I could carry!!!
Students taped the clear overhead sheets to their photos with one strip of masking tape and traced the black with extra fine permanent marker:


Only a few are done for now, but after tracing onto three clear sheets, I use hot glue to attach the tracings to their papers:
 |
| Sorry about the glare, these are really hard to photograph. |

The final step was to have the students glue their photo to the remaining/blank rectangle on their paper. I CANNOT WAIT to hang these in the hallway!
Tuesday, April 28, 2015
Mandala Time!
Ooooooo!!!! Aaaahhhhhhh! Nothing better than a colorful, symmetrical mandala!

My sixth graders are studying India right now (if you want my Smart Notebook file for my Indian unit, click here and look for the one entitled "Art and Culture of India"). One of the projects I have them do in this unit is mandalas. I've tried it several different ways, and this is the way that works the best for me (not necessarily the best way by any means).
I start out by giving them each a triangle/pie piece that I've made and copied on the copier (it's 1/8th of a circle that will fit on a 12 x 18" paper). Using compasses (I ordered new safety ones that I LOVE), students mark four lines, two close to the point and two further away. The then draw two lines connecting the marks they made and one shape, like this:
Or like this:

In the photo above, you can see the next step: cutting along the sides and leaving an edge along the top. I'm so serious that they follow these directions, that if they cut the top off I make them start over [which I never do, so they're shocked when I recycle it and have them start over]. Then they choose an oil pastel to color the back:

It's important that they color a nice, thick layer, because this is their pattern for tracing:

It's very important that they start on the edge of the paper, or they might not have enough room. Trace once (being sure to trace that upper line/top of the circle), move it and match up the lines, trace again, move . . . They can trace about three times before they have to re-color the back of their triangle with oil pastel.

After the tracing's done, they start coloring it symmetrically with watercolor pencils:


Confession: I use watercolor pencils because some color so slowly (or are so busy being social sixth graders) and some are so fast. Watercolor pencils level the playing field a bit with the "add water" step (some get to it, some don't). Here are a few "in process" mandalas:


When most students were done coloring (and I was gone, so a substitute was there) they cut them out and glued them to black. A few got glued to more paper for display in our offices (we have three) or libraries (we have two).

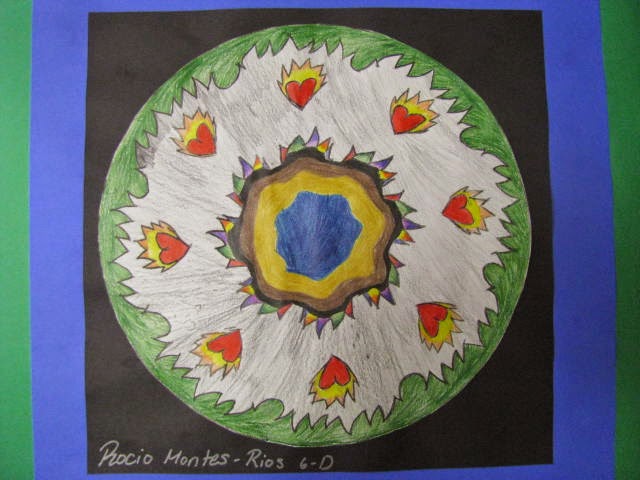


For me and my students, this is just a good successful-for-everyone lesson that also reinforces some math concepts and teaches them a bit about another culture.
Teach on, friends, the end of the year is so close now!
My sixth graders are studying India right now (if you want my Smart Notebook file for my Indian unit, click here and look for the one entitled "Art and Culture of India"). One of the projects I have them do in this unit is mandalas. I've tried it several different ways, and this is the way that works the best for me (not necessarily the best way by any means).
I start out by giving them each a triangle/pie piece that I've made and copied on the copier (it's 1/8th of a circle that will fit on a 12 x 18" paper). Using compasses (I ordered new safety ones that I LOVE), students mark four lines, two close to the point and two further away. The then draw two lines connecting the marks they made and one shape, like this:
 |
| On this one, you can easily see the compass marks on the lower line. |
In the photo above, you can see the next step: cutting along the sides and leaving an edge along the top. I'm so serious that they follow these directions, that if they cut the top off I make them start over [which I never do, so they're shocked when I recycle it and have them start over]. Then they choose an oil pastel to color the back:
It's important that they color a nice, thick layer, because this is their pattern for tracing:
It's very important that they start on the edge of the paper, or they might not have enough room. Trace once (being sure to trace that upper line/top of the circle), move it and match up the lines, trace again, move . . . They can trace about three times before they have to re-color the back of their triangle with oil pastel.
After the tracing's done, they start coloring it symmetrically with watercolor pencils:
Confession: I use watercolor pencils because some color so slowly (or are so busy being social sixth graders) and some are so fast. Watercolor pencils level the playing field a bit with the "add water" step (some get to it, some don't). Here are a few "in process" mandalas:
 |
| They were allowed to add things for interest with the watercolor pencils as long as they stayed symmetrical. |
 |
| A close-up of her value shading. |
For me and my students, this is just a good successful-for-everyone lesson that also reinforces some math concepts and teaches them a bit about another culture.
Teach on, friends, the end of the year is so close now!
Wednesday, October 16, 2013
Color Review Birds

Color review. Color review. Co-co-co-color review. I don't know why I want to white-girl-rap that, but I totally do. This is a total REVIEW lesson. As in: second graders, we all already KNOW THIS. I know you know this. Please, Dear Jesus, let them show me that they know this. Now don't look too closely at the above picture, or you'll see there are a few that need further review.
I made this lesson up for several reasons: we need some review of our primary, secondary and neutral color schemes AND I got these new Playcolor paint sticks that I wanted to try out. To see them, click here. If you'd like to purchase some, you could click here, here or here (I get nothing for recommending them, I just like them a lot).
We started out by using the Smartboard and doing a lesson called 'Let's Explore Color!' that I got from the Smart Notebook Exchange and tweaked to suit my classroom. You can download it here, just look for the 'Let's Explore Color' one. I found I use this file often, as it lends itself to many types of color review. After we reviewed color schemes, we wrote them down in our sketchbooks. We wrote primary colors and then listed them, writing the color name IN the color (wrote red with red crayon, blue with blue, etc), secondary colors and listed them, neutral colors and listed them (writing "white" in black, otherwise we couldn't see it). Then I gave them a 5 1/2" x 5 1/2" piece of cardstock-y sort of paper that I had, and had them draw a bird, making sure to touch most of the sides (no teeny-tiny super-skinny birds). After I checked them, they cut them out and traced them onto 6" x 18" paper that they'd folded into thirds:

 |
| The folding took a bit of work, "thirds" is a hard concept for many second graders. I had a couple who thought they knew where this was headed and they ended up with four spots instead of three. |

The Smartboard review, drawing-a-bird-tracing-the-bird-coloring-the-bird took one 40 minute class time. The next time they came to art I had them tell me what we did and what the color schemes were (in case I forgot, you know). We then got out our folders and our traced birds and our sketchbook notes. I had them work with their open sketchbooks right next to their drawings so they could double-check. Each table of four students got one of every color from the class pack except pink. The coloring took all of two 40 minute class periods, and it really took some thinking when you only have four colors to use and you want to make it interesting. Here are a few:
 |
| Love the primary bird on the top--he took some time on that one! |
 |
| I love how the secondary one on the bottom almost glows or vibrates. |
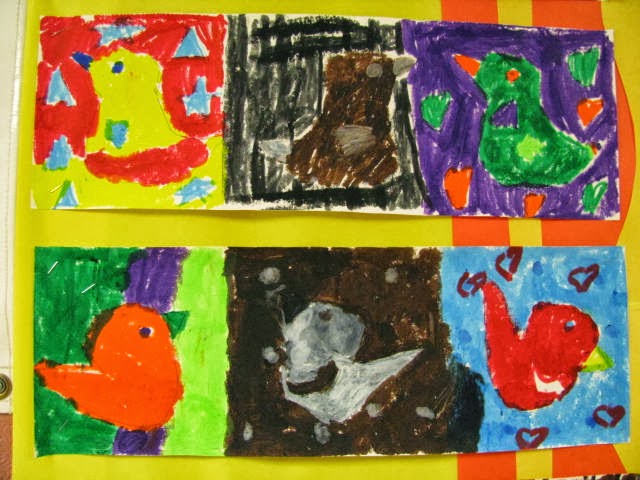 |
| Something about these birds looks a little haughty, don't you think? |
Happy art teacher-ing!

Monday, September 23, 2013
The Smartboard Changed My Life
It really did. Nothing else in 14 years of teaching has changed my life as much as my Smartboard did. If I ever switch schools and don't have one, I'll most likely cry. My most popular post is my Art + Math one, entitled "Totally Cannot Take Credit for This" about Paul Klee's "Once Emerged from the Gray of Night" and math. I got many requests for my Smart Notebook file, and with the help of my wonderful district tech person, I now know how to link Smart Notebook files to my blog (thanks, Linda!!!) So from now on out, I'll link my Smart Notebook files! To use them, simply follow the link, find the one you want and download (the blue arrow). I only ask you give me the credit if someone asks, and send some good vibes my way (I can use all I can get). Happy art teaching!

Subscribe to:
Posts (Atom)
