Fourth grade ancient coins, done and painted!
They're ah-mazing! The sound they make is so satisfying and old-coin-y. That's the official term (I know because I just made it up). I wrote about our first steps to this project earlier this year. After firing, we used metallic tempera block paint to paint them, and acrylic gloss medium (plain and platinum for extra sparkle) to seal them.
My fourth graders worked hard to get them painted and sealed in one forty minute class period. We laid them out on my back table to dry, and they dried enough for them to take them home the same day (I have fourth grade in the morning, and I delivered them to their class at the end of the day).
And now a glue update. Guys, upside down glue is AMAZING. I'm never going back! Some unexpected bonuses: it's very easy to see when glues need to be filled, and it's relieved some of my heavy sighing about filling all glue bottles at once (because I can just quickly look and fill the 3 or 4 that need filling). Students are really into checking to make sure glues are closed, taking better care of the nozzles and bottles. I have almost no one telling me glues are empty when really they just need to be opened. I have had to re-glue some magnets a few times, but not often. Life changing, this upside down glue!
A happy little blog for a mid-career elementary art teacher who's looking for the positive side of life, teaching, and spending her days with people under the age of 12.
Showing posts with label Clay Projects. Show all posts
Showing posts with label Clay Projects. Show all posts
Wednesday, October 25, 2017
Monday, October 2, 2017
Why Yes, We Are Making Money
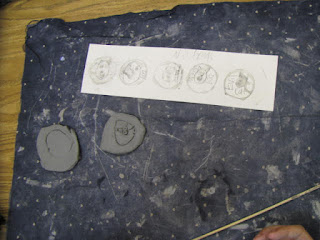
My fourth graders are learning all about the Mycenaeans and the island of Crete right now (you can get my Smart Notebook lesson for this here, look for the one labeled Ancient Greece). We watched Eyewitness Volcano (which is on YouTube and is AWESOME) and painted volcanoes and drew some Knossos-inspired mansions, and then we printed our own money. Yep, some counterfeiting going on in fourth grade art! We looked at coins from that era and watched the video of money being made in ancient times. I then gave them a strip of poster board (approximately 2 x 6 inches or so) and small circles to trace. Students used pencil to design their own coins. They then traced it all with glue and I put it on top of my cabinets to dry completely flat.
Once every student in the class was done and their glue was completely dry, we used clay to press our coins:
Glue not being what it was when I started teaching 18 years ago, each student also had a skewer to add details that were unclear. We also used our skewers to add our initials to the back of each coin (so we'd have a 'heads' and a 'tails'). Our coins are currently drying before going into the kiln (darn rain has made drying slow) and then we'll paint them with amazing metallic acrylic paint. Students always love using clay, so the making coins was a great success. We'll see how painting goes! They're so small, and I'm betting they're going to make a great sound--like real coin clinking.
Sunday, April 30, 2017
Last Kiln Firing Of The Year
It seems like every year I feel like the school year is going on and on and then suddenly TIME'S UP. While I didn't wait until the very last minute to get all the clay projects done, (looking at you, 2016), I did feel a twinge of worry about getting it all done in time. I've learned that my [older, but still working] kiln does much better (and fires faster) when it's FULL, so I filled it:
Top three shelves were second grade bells (simply a pinch pot, turned upside down with animal features added and two holes poked through to add a small sphere that you can see grouped in the middle).
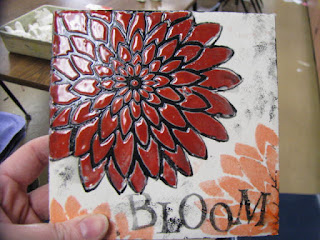
Then there was one shelf of glaze-fired tiles from a Mayco workshop I attended at conference (and I told two others who live near me I'd fire theirs). We used stencils and some different glazes--it's very similar to this lesson I found on the Mayco lesson plans site. I am thinking of doing a parent/child fundraiser next year with something similar (and maybe if I write it here I'll actually remember to do it!)
And then the bottom shelf was the sixth grade tiny painted houses (African tribe inspired):
They're even more luscious now!
I did have six (!) students who didn't want theirs, so I totally snagged them and have them displayed behind my desk because they're AWESOME and I LOVE THEM.
Second graders (of course) knew that their bells were amazing, and they did an equally amazing job painting them:
Whew! I'm tired. Good thing summer is only 16 school days away!
Top three shelves were second grade bells (simply a pinch pot, turned upside down with animal features added and two holes poked through to add a small sphere that you can see grouped in the middle).
Then there was one shelf of glaze-fired tiles from a Mayco workshop I attended at conference (and I told two others who live near me I'd fire theirs). We used stencils and some different glazes--it's very similar to this lesson I found on the Mayco lesson plans site. I am thinking of doing a parent/child fundraiser next year with something similar (and maybe if I write it here I'll actually remember to do it!)
 |
| We used some silk-screens and I missed part of my "L" |
 |
| . . . but Heather didn't! |
And then the bottom shelf was the sixth grade tiny painted houses (African tribe inspired):
They're even more luscious now!
I did have six (!) students who didn't want theirs, so I totally snagged them and have them displayed behind my desk because they're AWESOME and I LOVE THEM.
Second graders (of course) knew that their bells were amazing, and they did an equally amazing job painting them:
 |
| Action shot! |
 |
| We use tempera block paint for it's fast drying time and then add a layer of gloss medium for permanency and shine. |
 |
| You can kind of see the cotton string here that I use to tie the bell part in. I use cotton twine so they can paint it. I prepare the bells (tie the little sphere in) before students arrive. |
Whew! I'm tired. Good thing summer is only 16 school days away!
Subscribe to:
Posts (Atom)


