Thursday, February 14, 2013

Adaptive Class Every Day

We're a big school (over 1,000 students) and have a rather large life skills group (19-20ish) and we have them for 30 minutes of adaptive art, music or PE every single day.  That's a lot of lesson planning for that group.  I've had adaptive class my entire career, but I usually had them by themselves once a week, so all my ideas/old plans were used up by October.  This is where some serious googling and pinterest stalking comes in:


Thank you Pinterest!


Thanks again, Pinterest!


I'm not a teacher who does many holiday projects (OK, so I really don't do any holiday projects, I've got too much else to cover).  But for this group, I make an exception.  With Valentines Day (today) we've been working on a few projects, the overlapping tissue hearts (seen above, and also below) and a warm/cool weaving with overlaying hearts.  I will say that the weaving was a bit of a struggle to have the paras understand that the STUDENTS needing to be placing the weft, with para support (ie, holding up the warp). I was gone (to a meeting, I think) one day and came back to Obvious Para Work, or OPW, as I like to call it.

Students drew hearts with warm or cool colored crayons,
then painted over ( two different papers).
I cut the warp, students cut the weft and wove them.

Hearts were pre-cut and students colored with
oil pastel.

These hearts were also pre-cut.  My goal was to see how they overlapped,
 making sure they were gluing correctly, etc.
 A few groups added printing on top with the toilet-paper-roll
turned-into-a-heart trick, but not this group.

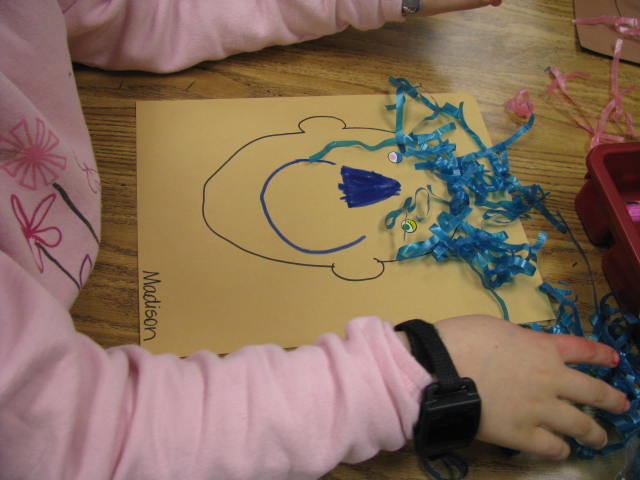
We've also done some non-holiday things, like our names (I drew their names, students cut them out and taped them to 12 x 18 paper) and collage faces.  (again, I drew the face, students used stickers, markers and ribbon to add details).  Here are some examples:


Name still on, AFTER student had fingerprint painted all around.

Name half off, just to see how it looks--we just used circles of masking tape for the taping.

Ryan really likes blue a LOT.

And Kyra always chooses pink if given the choice. 
The black is either earrings or hearing aides :-)

Love the nose on hers!

I'm sure there will be future posts on Adaptive ideas (mostly stolen off the internet) because there are never enough good ideas to go around.  I try to have cutting often, along with other fine-motor activities like gluing and painting, because it's something they all need to work on.
Oh! And ours are divided into three groups: high abilities, medium abilities and intense needs.  All of these photos are from the intense needs and medium abilities groups.

Thursday, February 7, 2013

Magic Snowmen

Unlike some other areas of the country, we have gotten nearly NO snow this year.  Or last year.  The year before, we got lots.  All this no snow puts quite a damper on our snowman painting.  Thank goodness for this book: Snowmen All Year by Caralyn Buehner.

Snowmen All Year

I read this book to kindergarten one class period, and had them draw their snowman large on their paper.  The premise of the book is What if it were magic snow and the snowman could stay with you all year?  You could play in the yard with him! You could teach him to swim! You could go trick-or-treating together! You might know the author for one of her other books, Snowmen At Night.  

The first day, I have them draw JUST the three circles (like they've built the snowman but haven't added all the "extras" yet).  Then they trace it with glue:

Sorry for how hard it is to see--it's hard to photograph
white glue on white paper!
The next time they came to art they drew with pencil all the details of their snowman, as well as themselves and the background (I wanted them to be creative with where they were with their snowmen and what they were doing):


The final day or two was spent painting (with tempera blocks) all the beautiful colors on their papers.  I had to remind them over and over that snow is WHITE, so that part should be left unpainted.  Here are some of my favorites:


This snowman is in the water on a warm summer day.
The student is on the floaty on the right.

Snowman in the yard with the child on
a nice warm day.

This one might be at school with the student?  Sometimes
it's hard to tell, but that doesn't make it any less adorable.

Another outside-on-a-warm-summer-day one.


There were many more cute ones, but so often they decided to paint their snowmen green or red and then they got "lost" in the painting.  One of my favorites was a snowman at the movies with the child!

Wednesday, February 6, 2013

Paper Molas in Fourth Grade

My fourth graders have been deep in a Mexican crafts unit.  Many things we made I didn't get around to photographing (ceramic Oaxaca creatures, tinwork, Papel Amate) but I did take the time to photograph our latest work: molas.  Based on the molas of the Kuna people of the San Blas islands, we really work to make them colorful:


Each student makes two.  They're given two 9 x 12 black papers and choose THREE 6 x 9 different colors of constuction paper.  They glue two of their 6 x 9 papers, and keep one loose. They then draw the outline or shadow of an animal/creature on the loose paper and cut it our all in one piece:

This is a student who was sick and absent a lot, so hers is unfinished.
 They then put the positive image on one paper, and the negative on the other one.  Then they use a variety of colored paper to add shapes and details.  I tell them to "cheat" and cut two different colors of paper at once, so they get twice as many shapes for their work.

A close-up of her zebra.

Here you can really see that he cut the green and blue
grass shapes at the same time.
These are always so successful for students, (as the whole Mexican craft unit is, I'll really have to remember to photograph their other crafts next year).  Now, we're moving on to George Catlin and Native America.

One final one, (I couldn't resist!) he's a truly delightful
special needs student who makes us all smile every day.

Saturday, February 2, 2013

Ceramic Garden Project

So, this isn't something I did with students.  Although, I suppose you could.  See, my husband and I go to support group.  It's a group NO ONE wants to be in: a group for those of us who've lost a baby through stillbirth (check), miscarriage (check), or infant death (thank God, no check). And every year we have a holiday or post-holiday party.  We all bring something for everyone else to remember their babies (a Christmas ornament, little memento for the house, etc).  This year, I decided to make garden ornaments:


Most of them turned out exactly as I wanted.  The metal piece is some sort of roofing/tressle thing from Home Depot.  They cost 53 cents each.  I used leftover clay, rolling into slabs, then pressed pasta letters in and rolled a teeny bit more.  I then used a straw to make the holes, let them dry under books (to prevent warping while drying).  Fired, dipped in glaze, re-fired and wired to the metal (which already has the holes).  More photos:


I wrapped them all in simple brown craft paper and wrote who they were to with marker.  Unfortunately, Bad Kitty ripped several of them open overnight (we have Good Kitty, Old Kitty and Bad Kitty--good thing they're all cute).  Our party is tonight, so I'll be doing some re-wrapping this afternoon.
 
I was in a bit of a time-crunch waiting for people to RSVP, so I have NO TIME for re-dos, but I don't really like how the green glaze was so thick it pooled and didn't fill in the letters:
 
 
Oh, well, it's the thought that counts, I guess.  And there's nothing but warm thoughts and prayers for healing behind them.
 
I do think I'd make more of these.  They were fun, and easy and there's so many possibilities: for my vegetable garden, memorials for others (maybe in my Etsy shop?!), adding stamps (I thought I had a butterfly stamp for these, but I couldn't find it).  I'm sure all you creative art teachers could come up with so many other ideas around this.


Tuesday, January 15, 2013

Forgotten Second Grade Lesson

I came across something that jogged my memory (an example? actual lesson plan? I don't even remember now) about this second grade lesson:


I hadn't done this lesson since my older children were in second grade (and they're high school juniors, so it's been a while).  I ordered two buckets of foam letters (actually, letters + numbers) and used up all the burlap I had, then went to the many, many yards of felt that I got when a local clothing maker went out of buisness.  It's their first fibers project, and they do really well after they figure out how to cut felt with scissors.

Brown burlap on brown table= not the best photo.
This student did a great job overlapping her felt
to add interest.


We started by planning out our wall hanging in our skechbooks--I told them not to worry about drawing their letters perfectly, but just to get the general idea down.  I wanted them to have their name and things made out of felt that they enjoy doing or just like.  I was very happy with the results, and so were the students!

The red spider-looking thing is fireworks!

The ones above the water are dolphins.

On this one, I left the paper underneath for the photo.
We used the paper to keep them from getting glued to
the tables, and it made them easier to put in the
drying rack.

Bunny and bird cuteness.


I thought about adding other things for the students to glue on (lace, yarn, etc) but in the end I just really liked the layering and the look and feel of the felt.

Astroids and lava!  I find it so interesting
that even with the formed letters being given to them,
some students still put them on backwards.

He and I had many discussions about layering:
would the yellow look better over the windows?
Could there be yellow over the black "stars"?


This student was initially upset over my lack of brown felt,
but she came up with her own solution for her ice cream cone.

This student is an "outside the box" thinker, and her work
is usually the envy of the class.

Close up of Angelina's cat.

Students are taking these home this week.  When my older two were in second grade, they were so very proud to hang them on their bedroom doors at home, and couldn't wait to show Dad when he got home.  I'm hoping for that reaction for my students (I usually hear about it all later).

Saturday, January 12, 2013

To be PERFECT, what does that mean, exactly?

Tonight I read this post by my friend, Jenny.  She's not an art teacher, and, thus, it's not an art teacher blog, but it got me thinking. Specifically, I was thinking back to an incident that happened sometime in my first several years of teaching.  We had some concerns about a student, and were calling the parents in to discuss the child's [lack of] progress.  I'd brought some of her work samples to the meeting and when I showed the mother, she cried.  Not out of worry or concern--out of love and adoration.  I quickly realized several things: #1, always bring "benchmark" work to parent meetings (artistically gifted/talented student work, average work . . .), #2, you never really know what goes on at home--a child with it all together may not have a great home life, and conversely, a struggling student very well could be the center of a parent's universe (as the all should be), and #3, I [was] a lot more of an uppity b&^$% than I realized. I was young.  I'd gone to a top-rated private art school AND had gone on to get a whole other bachelor's in art education after that and had probably started on my master's.  I thought I knew exactly what I was talking about and the parents would just be bowled over by my knowledge, prestige and confidence. Ummmm, not so much.  I can only speak from my own experience, but I know I learned a heck of a lot teaching those first seven and a half years in a brand-new urban elementary school with changing administration, revolving staff and no playground or discipline plan until well into the second year.  And I learned it on my feet, and quickly, if I didn't want to get ran over.  I had a child to feed, clothe and house, so failure was never an option.
That parent meeting sealed some things I'd followed but had no real reason why prior to that day.  Things like: I hang up everyone's work.  Period.  Not finished? Still hanging it up.  Not that pretty/really sloppy/looks-like-you-were-riding-an-outer-space-pony-while-the-directions-were-being-given? Still hanging it up. Life skills/multi-handicapped student mainstreamed into the class? Definately hanging it up with all the others, and proudly,too.  Watching that mother tear and up and say "ooohhhh, it's so beautiful" over the very artwork I'd looked at scornfully just before made me stop and realize I had no right to think that I knew what was going on with her daughter when she worked on her art.  I also realized perfection isn't the goal, thinking is.  When I first became a teacher (one where I had my own classroom and my own plan) I said "I want them to think" but I didn't really dwell on it.  Thinking was the forefront of what I taught, it drove my instruction for many years.  And then, well, I don't know what happened.  Maybe it was just something that got a little lost in the shuffle, maybe it's all those conferences I go to, blogs I read where everyone's stuff looks so great and I think "Oh, my kids can do that!" without even thinking WHY should they do that? Is it important? Will it help them become better thinkers? Better artists?
There's so much we deal with as teachers (in my district right now, it's learning targets, and I've got to be honest and say--I forget all about them all the time.  Sometimes I post them, I never read them to the students, I don't even think they know where to look for them. . . SIGH, I really suck at this) and it's easy to get caught up in this or that (latest educational trends, juicy workplace gossip, oh-my-goodness-I'm-probably-a-step-or-two-away-from-being-featured-on-Hoarders: Buried Alive-based-on-the-state-of-my-classroom) and just LIFE.  I want to remember my goal: to educate them to think about a variety of solutions to problems, not to strive for "perfection."  'Cause I'm not sure I even know what that is, but if we achieve it, what else is left?  Now to go prepare some PERFECT lessons to foster thinking. . .

Thursday, January 10, 2013

Fifth Grade and Lady Liberty

We've been working on patriotic symbols in fifth grade, and I got this lesson several years ago at my state's fall conference (at "Drag 'N Brag", as it were).  Someone in my district said it was in an art education magazine (Arts & Activities, maybe?) but I didn't see it there.  I love this lesson because it covers the 5th-graders-learning-about-patriotic-symbols Grade Level Expectation from my state and they learn/re-learn all about monochromatic colors.

We drew with pencil, outlined with black tempera block,
and painted with tempera.

Love this one!  This student is a "detail" sort of girl.
 We started out with a SmartNotebook lesson (that you can download here), where we brainstormed symbols that remind us of America, and looked at some (like the Liberty Bell, the American flag, etc).  The last slide in the presentation is just photographs of the Statue of Liberty.  They choose one (there's six to choose from) and draw it.  I put the slide up every time they're there--drawing or painting.

Some of them on display in the hallway--
I love the one with the extra-long neck (second from the left).

More of our display.

They always want to fill in pupils in her eyes.
This student went back and covered them.

I love how "painterly" this one is, it has personality!
These are always so lovely, and no two are ever alike.  I let them choose to have a light blue background or an American flag in the background.
God Bless America! Land that I love, stand beside her, and guide her . . .
Pin It