Friday, January 10, 2014

Chinese Lotus Books

I feel like I start so many posts in this fashion, BUT, this is a lesson I got at our state conference, hmmmm, probably more than 10 years ago. I actually hadn't done it in FOREVER, but I pulled it out for this group of sixth graders. Part of the reason I hadn't done it in a while is because (and I'm going to sound really old here) glue has really changed in the past 15 years.  It no longer stands up when dry, and I really need it to for this project.  So what's a happy art teacher to do?  Substitute Model Magic or Cloud Clay, of course!


This is the cover.  Years ago, the butterfly would've been made
with a glue line.  We used Model Magic/Cloud Clay.

This is the book open, in it's "lotus blossom" form.
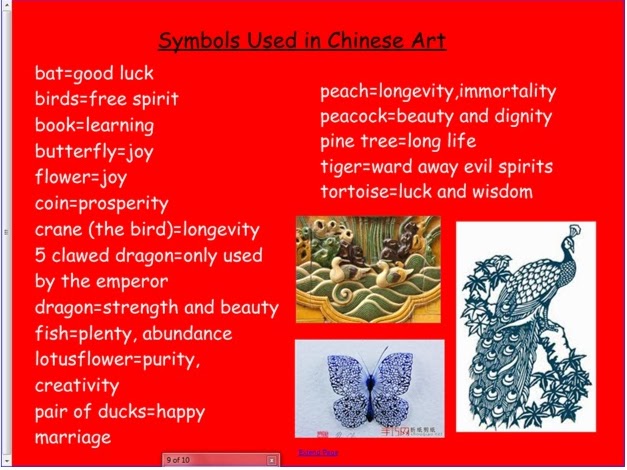
As always, we start our Chinese unit with a smart notebook activity, and you can get it here, just make sure you download the one that says "Chinese Culture and Art".  We spend one class period doing the smart notebook lesson and taking notes in our Asian Art Books (I really should've blogged about that lesson, but alas, I did not!).  When they take their notes, I don't have them write all of the symbols, I just have them choose one and write their choice and it's meaning in their books.  I leave this screen up for a bit for them to choose:


The next time they come to art, I meet them at the door and give each student four 12 x 12 papers.  They get a pencil on the way to their seat, and write their name on each one.  Near their names, I have them write WARM on one, COOL on one, NEUTRAL on one and FREE on one.  We then review those color schemes and they get to work painting with watercolors.  The can only have white showing on their neutral and free choice pages--warm and cool have to be FULLY painted.  I've noticed that sixth graders kind of take their time painting, they're at that self-critical age where they want everything to be perfect.


Free choice.

Cool (same student as above).
Sometimes the painting goes on just FOREVER, so we take a little break and make our symbols on leftover 6 x 6 cardboard/matboard/foamboard/what-ever-I-have-laying-around.  This year it was foam board.  I have them draw their symbol out first, and I check it before the get their Model Magic/Cloud Clay--I check that they're not too small, or have too many details, because those things will make it too difficult and students will get very frustrated.


Students must GLUE their Model Magic/Cloud Clay coils,
or they'll pop off when dry.


We then wait for our covers/symbols to dry, so we finish up our paintings.
When our covers/symbols are dry, they become our printing plates for our four paintings:


This time I wised up and used tempera instead of printing ink:
less sticky, so our pages didn't tear when the books
were put together.


After all that is finally done I show them how to fold them.  They fold the square paper in half (paint on the inside), unfold and fold it in half the other direction (paint on inside) and then ONE TIME into a triangle (paint on the outside).  If they do it correctly, it sort of "pops" in so that it folds in on itself:


After folding their four pages, they line them up so all the folds and openings match, and then they glue them together.  Now it's only a matter of gluing on their cover, coloring it with oil pastel, and adding an "About the Artist" sheet on the back.  I love the little details in the About the Artist profile, and if students hang on to them, I think they'll really like looking back at their sixth grade selves in a few years.


Tuesday, January 7, 2014

Just a Little Leftover Christmas in January

Time is always so rushed in December.  I have an almost impossible task of getting things done at school AND at home during a month that's rushrushrushRUSHRUSH, and then . . . nothing.  Blissful NOTHING.  No where to be, nothing that must be done RIGHT NOW.  I thought I'd use that time to catch up on some blog posts, but you know what?  I didn't.  I read.  I loved on my babies.  I tried interacting with my teenagers (emphasis on tried). I read some more, loved on my babies some more, watched some Netflix.  So, NOW, I'll do some of those posts I thought I'd get done in December.
Here are two lessons I usually get done and send home before the winter holiday break:
Fourth Grade Oaxaca Sculptures

Second Grade Collage Calendars

The Oaxaca (pronounced Wah-Haw-Ka) sculptures are a lesson I got from Sharon (who I student taught with many years ago) at a state conference, and the calendars come from the book Awesome Art Activities Around the Year, which I think I got from the library years ago, and this was the only lesson that "stuck."
So, the Oaxaca sculptures are made of clay, even though the real ones are made of wood.  I give the students some background information about the Mexican artists who made them in Oaxaca, and have the students make a drawing of the one they're wanting to make:


Traditionally, they're very colorful, so I encourage lots of color on their drawings.  The background info and drawing takes one class period--oh, and I also do a demo of how to make them that same day.  The next time, they make them out of clay:

Toilet paper tubes are used to hold them upright while drying.


They dry, are fired (I forgot to take a picture of them at this step, remember, it was rushrushrush December).  Finally, they're painted with acrylic paint and sent home as wonderful holiday gifts:


While fourth grade is making their sculptures, second grade is working on their paper calendars (I'll be honest, most of my second graders are still working on them in January this year!).  They start out with a 12 x 12 white paper and a bunch of 3 x 3 squares (all colors).  I show them how twelve squares fit around the paper, just like there are twelve months in a year.  They have to think of something for every month (a snowman or snowflake for January, a heart for February, etc). The hardest months are August and September, but we settled on going-back-to-school for August and first day of fall for September.  I also tell them they can make a cake for the month of their birthday, HOWEVER, everything must be cut and glued (no drawing or coloring).  They've turned out pretty well so far:


The final step is when I staple a 2014 calendar in the middle.  I get it from waterproofpaper for free online.  You can go to their site here to print your own.  Once I print it out, it has to be minimized to 64% to fit the collage calendars better.


I'm sure parents will still love our calendars, even though most of them will get them in January instead of December.  One last adorable thing, a student said to me, "Mrs. Fresia, can I get a 2014 calendar for mine? Because 2013 is almost over." Awwww, they're just so darn CUTE, I tell you!

Wednesday, December 18, 2013

Chalk Crayon Symmetry Magic

Third grade is on their art-history-quest, and we're up to Stonehenge.  With Stonehenge, I talk a lot about symmetry.  If you want my Smart Notebook file for Stonehenge, you can download it here.  We do a couple of symmetry projects, and the chalk crayon lift is the first one.  


This is a lesson shared with me in college by one of my professors. (Thanks, Dr. Smith!  I've gotten a lot of mileage out of this one!)  It works like this: students fold a 12 x 18 paper in half (I have them write their name and class code in marker and then turn it over or turn their name to the inside).  Using light and bright colors of chalk, they cover one side (9 x 12 size) with chalk:

Student working--I have them just do a design,
not spending lots of time on anything intricate.
To keep things [relatively] clean, we put our papers in folded newsprint in our folders at the end of class.  Once the whole side is covered with light and bright chalk, they completely cover what they just did with a heavy layer of black crayon:

This one is pretty much done.

A done one with a needs-a-lot-more one.
This is the point in the lesson that you'd better be sure they really like and respect you as a teacher, because the black coloring can get UGLY fast.  Be prepared for lots of whining. But have no fear!  The awesome part is coming, and you'll be their hero again before you know it!  I really keep them all together on their steps (ie, no one moves on to the last step until everyone is done with black crayon), so it's beneficial to have a little "filler" project for the early finishers.
Once everyone has their black crayon done, we turn that part to the inside, and use pencil on the outside to draw a picture (I say no words, but they always sneak some in).  


I have them use fat/kindergarten-type pencils so they get a thicker line, and they have to press pretty hard.  The pressure of the pencil lifts the crayon off the chalk, and viola!


These are really cool, and the students love the final product, but I'm struggling with wanting a specific theme for them to draw.  It seems like there's no "middle" with this project, they're either amazing or a scribbled mess.  We'll see if I think of some sort of theme for their drawing before next year.


Pin It