Friday, April 17, 2015

Art Show 2015--SUCCESS!!!

I think all art teachers feel this tremendous relief when the art show is over.  Ours was a rockin' good one this year.  Here's a few shots of the hallway displays:

Sixth grade work

First grade work

Kindergarten work

We only had two tables of ceramic work on display this year (all sixth grade):


I also added some "MAKE ART" tables this year for my 3rd-6th graders. But I couldn't get ONE sixth grader to sign up, so we only had three stations (third, fourth and fifth).  Third graders showed art show patrons how to make paper bracelets, fourth graders led them through making a self portrait, and fifth graders helped them make mini sketchbooks:


And I'll close with a few more hallway shots because I'm too tired to form coherent thoughts for blogging this morning (you should all feel a bit sorry for my students today, because the struggle is so real for me to be "on it" on the day after the art show).

First grade work

Fourth grade work

Keep pressing on, art teachin' friends, the end of the year is in sight!

Wednesday, April 15, 2015

Don't Forget to Brush Your Teeth, Kindergarten!


This adorable lesson is one I'd forgotten about.  I was at a conference (don't most of my lessons/posts/ideas start out this way?!) and saw another teacher's lesson where she had young children draw very large, I just added the hand and toothbrush.

We started out looking at ourselves in mirrors and drew with pencil.  We made our "brushing our teeth" face and tried to look closely at all our teeth (or the spaces where our teeth were before they fell out).  After drawing, students traced with Sharpie and colored with crayon, trying to make the best, most realistic colors they could.  


Next we chose construction paper the closest to our skin color (I'd cut them to a 6" x 9" size).  Using pencil, students traced ONE of their hands and cut them out.  Then they glued them hanging loose from their papers:

This is a super-strange shot of hands glued
(each paper has ONE hand glued hanging down,
though it totally doesn't look like it here).
Finally, I led them through making a toothbrush.  Students chose one color of 9" x 12" construction paper, folded it long and skinny, glued it and folded it skinnier and glued it.  To make the toothbrush handle, I had them hold their hand at one end and draw two little lines to cut on.  They folded the handle part in thirds (and glued it) leaving a larger "head" for the bristles:

This one's a little too big, but you get the idea.

We used paper straws for the bristles, cutting them (and watching them jump all over the place), folding little "baby feet" and gluing them on:


The hardest part of the whole thing was figuring how to glue the toothbrush on the hand in a realistic way.


Ideally, the toothbrushes are left a little loose so we can brush our teeth by moving it back and forth and saying "I'm brushing my teeth! I'm brushing my teeth!"


While this is a great lesson for talking about oral hygiene, I did tell my kindergartners they can't brush their paper teeth and tell Mom or Dad "yes, I did brush my teeth!"

Thursday, April 9, 2015

Art Show Excitement is Building, and Thinking of Moms

We've been busily making art show invitations:


This is always the time I know, without a doubt, that I could never be one of those teachers who teaches the same thing class after class, day after day.  Mind numbingly boring.

We've also been working on a Mother's Day gift in adaptive art:


It's a brooch made with tagboard, colored glass, black Cloud Clay and a safety pin thingy:


We put them in papier mache boxes that we (the other art teacher in my building and myself) ordered.  Just some tissue paper with watered down glue and a paper flower on top.  Adorable!  I want one!


Here's the break down: we had students draw a shape on a 3 x 3 piece of tagboard and cut it out.  We then used regular old Elmers glue to glue colored smooth-edged glass (that we ordered from somewhere--Dick Blick, maybe?), making sure to leave space between each stone.  We let them dry overnight (we see each group a week at a time which is also why we're starting Mother's Day gifts in the middle of April) and pressed black Cloud Clay in the spaces (for grout).  We then worked on our boxes while I hot glued the pins to the back.


I sure would wear that sucker PROUDLY. (Confession: I was totally wearing a couple around this morning to "try them out" and "make sure the glue would hold") I hope their moms love them as much as I do.

Tuesday, April 7, 2015

After 15 Years of Art Shows

. . . I've learned so much.  First of all, do not try to do it all yourself.  I get it, control freaks, I do, for you are my people.  You are my tribe (although we wouldn't really be a tribe because we'd all be sure someone wouldn't do their job "right" so we'd sigh and take it over and do it all ourselves and end up a bunch of individuals squabbling over things).  Have your students help, it's their show gosh darn it, so let them do some things.  I remember being new and veteran teachers talking about all the things they had the kids do and I thought 'HOW? It's all crappy and sloppy and wrong when they do it! Glue everywhere, nothing put back!' And the secret is this: let them do things within some very tight parameters.  For the five years I was pregnant (no, really) I was so very exhausted all the time that I really took this one to heart and had 2nd-6th grade choose and glue their artwork and it looked ok.  OK if you happened to be the students' parent/grandparent/doting aunt and didn't notice didn't mind the smeared glue all over the edges or the fact that some of the artwork was glued upside down.  This year, I did it similarly (kept all student work all year, chose a day about three weeks out from the art show and passed it back and had students choose their two best) but I glued it down.  While I was calling students back and gluing, they worked on a "folder"(a folded 12 x 18 manilla paper decorated with marker) to carry all their artwork home in. I even did K and 1st this way this year, and you know what??? It turned out FABULOUSLY.
Secondly, use your resources! For years I wrote out each student's name and glued it to their artwork.  Now? I have the secretary print out names on sticker labels.  SO much easier.  She prints them one class per page, and if someone's work is missing I know immediately.  One of those d'oh-why-didn't-I-start-this-years-ago things.
Thirdly, (is that a real word??) get the students excited.  I have my students make invitations the week leading up to the art show.  We just spend one class period making invitations.  I print off the specifics like this:


so they can easily be cut apart and glued on the inside of the invitations.  Students can make two or three and I've found they are more likely to come if they make a super-cute-and-covered-with-Mr.Sketch-smelly-markers invitation.  This year, I'm also having students in third through sixth run little tables near their hallways demonstrating a technique or project we did this year.  I'll try to remember to take some photos (next week!!!) and let you know how it goes.
Finally, remember that it's not the end of the world if everything doesn't go perfectly.  I used to spend every night and weekend at school until the wee hours getting everything "just so" and you know what?  It's only one night, so don't drive yourself to an early grave: get a good system working and do your best.  It'll be great!  (Even greater with a system that gives the students ownership AND allows you to keep your sanity!)

Friday, March 27, 2015

Let Me Give You a Hand With Some New Ideas


Ok, I'll admit, that's a really cheesy title to this post.  But it's a fun lesson!  These are simple henna tattoos that my sixth graders created as part of our unit on India. (You can download my Smart Notebook file by clicking here and looking for the one entitled "Art and Culture of India") Sixth grade artists began with tracing their hands on 12 x 18 paper, then shading them with colored pencil as realistically as they could.   Next, they used thin-line brown markers for the tattoos.  They needed a little something, so we finally cut them out and glued them to some decorative papers that I had.


As always, some turned out better than others, but this project was very successful for all of my students--inclusion students included!


Also this week, I hung up the third grader's sarcophaguses in preparation for this year's art show:


You can learn more about this project by reading my previous post. The last two years we've been coloring them with metallic playcolor, LOVE LOVE LOVE! (although, kind of expensive and we go through every bit of a class pack box for three classes)

Less than three weeks until the art show!  I'm sure I'll do a post about it (how can one be an art teacher blogger and not?), but until then, get out and enjoy the beautiful spring weather.  Unless it's dreary where you are (then, I guess, stay home and read a good book!)

Thursday, March 12, 2015

The Good, The Bad and The AMAZING

We finished some more Wild Things in kindergarten:


Soooo good! So full of personality!

And I tried re-firing the Egyptian Paste that didn't work last time:


Bad, awful, terrible and now in the trash.

Are you ready for the AMAZING?!  It's really amazing!


And a close up just so you can see some of these amazing details.

A KINDERGARTENER drew this! It's her "I Am An Artist" drawing.  Phenomenal! I can't wait to see the progression as she gets older.  She's really going to be something!  This is the best, people, the BEST! Why would I want to do anything else? (except, maybe, win the lottery, but that's a post for another day)

Monday, March 9, 2015

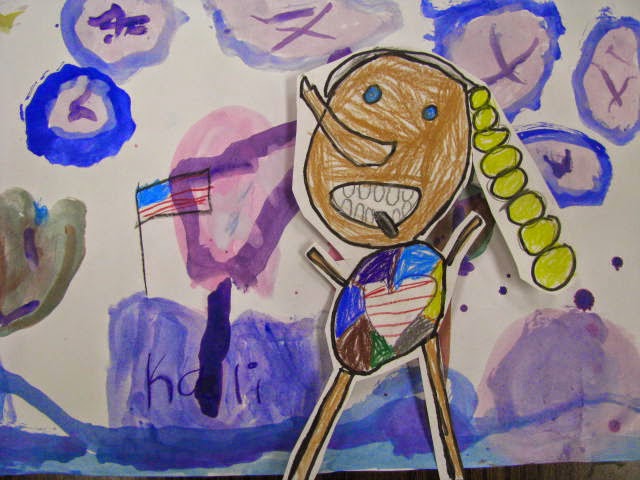
Kindergarten Is Full of Wild Things!

Anyone else feel like they need a thousand new kindergarten lessons each and every year?  Even after 15 years of teaching, I still get to about February and think "I need more for kindergarten to do" or "there are not enough lessons in my kindergarten binder section to finish out the year" and the panic sets in.  The lesson I'm going to share with you today is not earth-shattering, it's an oldie-and-a-goodie with a little twist, pop ups:


The first day we read Maurice Sendak's Where the Wild Things Are and drew our own wild things on 9 x 12 paper with pencil.  We then traced them with Sharpie and colored them with the Crayola color sticks (I'm loving those lately).  The next time they came to art I had 12 x 18 paper all ready for them with their names written on the back for them to paint a background for their wild things with block tempera (we used the Biggie Cakes):

"Bonus" wild things and cave (we don't always follow the directions/rules,
but that's OK when you're working as an artist)

Tornado and boat on the water

Rainbows and trees--I adore kindergarten rainbows!
The third time they came to art, we cut out our wild things, leaving a little "halo" around them, and used our trash to add paper rings to the back so they'd pop up.  Love them!


Really, I know it looks like a cigarette or something,
but if you saw it close up you would see it's a silver tongue.
I love kindergarten projects like this, ones that turn out all kindergarten-ey, all different and colorful and amazing.
Pin It