Tuesday, May 19, 2015

New Friends in Second Grade

I do that mental checklist in my head every year: "did every class/grade level have a rich art experience?" "Did they paint? Use clay?" and usually, printmaking is the one I don't work in with everyone.  Thus, this lesson was created for my second graders.  


We started out reading My Friend by Beatrice Alemagna.  You could buy it super-cheap on Amazon here (I bought mine at one of those damaged freight kind of places that most teachers frequent). 
We then fingerpainted, one day mixing primary colors, and one day mixing secondary colors (each student ended up with two papers).


This was just a fun, let-down-your-hair sort of day.  Little tip I picked up in student teaching: have students paint with one hand and have them clean that hand off the best they can with paper towels before washing, so much less messy!
Next we used donated foam board and something called rosecord that I found in the cabinet when I started here 8 years ago to make a shape:


We then printed that shape onto our [dry] fingerpaintings.  This ended up kind of a mess (think brayer cleaning).  I use ice cream tub lids and we used tempera paint instead of ink (I've had problems with the ink staying sticky in the past, so we stuck with paint).


Sadly, this is the only photo I have of this step.
Students printed their shape two or three times per fingerpainted paper.

We then started some books (I did have a master plan, but I'm pretty sure the students thought we were just doing a bunch of random lessons).  I fell for these artist stamp sets in a catalog (I was going to link to them, but can't find them anywhere now).  In the photo it showed the artist portrait with the artist's name under it.  When they came: no name ANYWHERE on the stamp, front, back or side.  They've literally sat on my shelf for years, but were perfect for this lesson.  I gave 4-5 stamps per table, one pre-made "book" (i.e, three 6 x 12 pages stapled together in the middle) per student and some markers.  I also opened up the scrap box and had the students make environments: country, city, underwater, etc.  

Rainbow affect with one stamp being used over and over.


Love how the artist is inside the castle!

Salvador Dali!


Students LOVED this.  Everyone had a great time, they were super imaginative and amazing.

Next, we cut out our printmak'ed (is that a word? Or did I just make it up? Heck, it's May, I'm just going to go with it) shapes and remembered the Friend from the book we read eons ago.


Students added marker details and created a story (not really with words, only with pictures).

Then we colored our foamcore/rosecord shapes with oil pastel and glued it to our front for a cover:


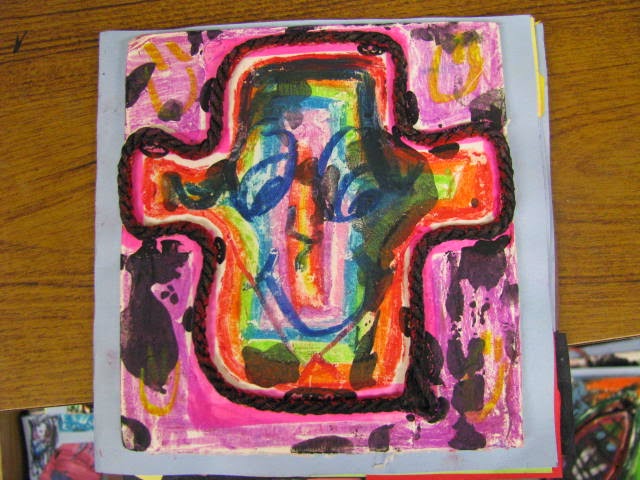

The final step is to add an "About the Artist" sheet on the back:


While these did take a really long time, the students loved making them, and they learned so much along the way. (Confession: we'll be working on them until the very last second, so maybe I shouldn't use past tense here).
A few more photos, just because they're Ah-Mazing!

At the beach.

Formal wear.

Walking down the street.


I think this is me.  At the lake or beach or next to
my kid's kiddie pool.  Summer is soooo close!

Wednesday, May 13, 2015

This Is Not a Happy Post, But Maybe a Necessary One

One of my students has cancer.  I guess, technically, he's not "mine" as the other art teacher had him in her class this year (all 3 weeks he was here).  But I remember him in kindergarten (when he was SO rambunctious in class, when he saw me out with my family at a restaurant he nearly knocked me over with his powerful hug), and last year, when he was in fifth grade. His teacher had concerns about his need to go to the bathroom all the time, so his mom took him for a checkup and they found brain tumors.  Stage 4.  It nearly takes my breath away whenever I think about it.  But he's hanging in, responding to treatments.  I pray for him and his family so often, sometimes (it feels) with every breath.  Because I know what it's like to lose a child, and I don't want that pain for anyone.
If you teach long enough (and I'm starting my 16th year next year), you'll have the crushing pain of losing a student.  Whether it's your second day teaching (did that happen to anyone else, or just me?) or your 20th year, something horrible, incomprehensible will happen.  And it sucks. 
So what can we do? As art teachers?  We can love them up one side and down another while we've got them in our rooms.  We can work hard to make joy in little moments and not get caught up in the day-to-day, gotta-get-this-done, WHY-are-you-bothering-me-with-that sort of things that happen in schools.  Because you never know who or when or what could happen (in an instant) to change it all.  Let's all reaffirm our commitment to bring as much joy and happiness to others as we can for as much and as long as we can.
Art on, friends.

Tuesday, May 5, 2015

Dreaming a Bit Like Marc Chagall

This is a lesson my fifth graders worked on for quite a while.  We talked about Marc Chagall and looked specifically at "I and the Village".  Then we reviewed some simple math concepts.  Students set up their drawings with an acute angle, an obtuse angle and parallel lines.  They could have a right angle and/or perpendicular lines.


Next we talked about dreams we've had.  So many dreams are anxiety related!  I guess I really never thought about it, but after dream dictionary-ing many the students asked about, it makes sense.  Each space was a different dream/weird idea.  We drew with pencil, traced with ultra-fine Sharpie and painted with Biggie Cakes.  Some got further than others:


My plan is (was?) to hand them in the hall for the fourth graders to find our angles and help them with learning/reviewing those math concepts.  But the end of the year is fast approaching and I wonder if it's worth the time to hang them all . . . reality is I'll probably do it anyway!
I do really like how these turned out, even the ones that didn't get all drawn or painted, they're just so interesting.

Monday, May 4, 2015

Starting to Think of Summer Days Spent in the Garden

It's spring! Like, all-the-way-really-truly spring around here.  To help bring on nice weather, first grade and kindergarten artists made some beautiful gardens:

A group of first grade flower/butterfly gardens.

Kindergarten garden with snake.
I thought I'd blogged about the first grade gardens before, but can't seem to find the post . . . my brain's pretty overloaded this time of year (Jesus help me if I need to remember anything like my debit pin number or my own children's names the last month or so of the school year).  Anyway, first graders used 6 x 18" blue background papers for the sky and 4 x 18" green papers to make the grass.  They then used construction paper to make flowers and colored butterflies (it's a photocopy of four butterflies that I've had for like, a million years):


I only let them cut out one butterfly at a time, color the back (symmetrically, of course) and glue them on one at a time ('cause I don't like lost/confused butterflies).  They glue only the body with the wings folded up:


The kindergarten lesson is one I got from Arts & Activities issue March 2006 (thank you Mary McNamara Mulkey from Sumner, Washington, I use this lesson a lot).  Kindergartners draw along with me making flowers using ONE color of marker, then color in and draw some ladybugs.  


Because my first graders can't accordion fold, I added a pattern snake this year (we used 2 x 24" paper):


And one last close-up of a nicely colored flower:


Tuesday, April 28, 2015

Mandala Time!

Ooooooo!!!! Aaaahhhhhhh! Nothing better than a colorful, symmetrical mandala!


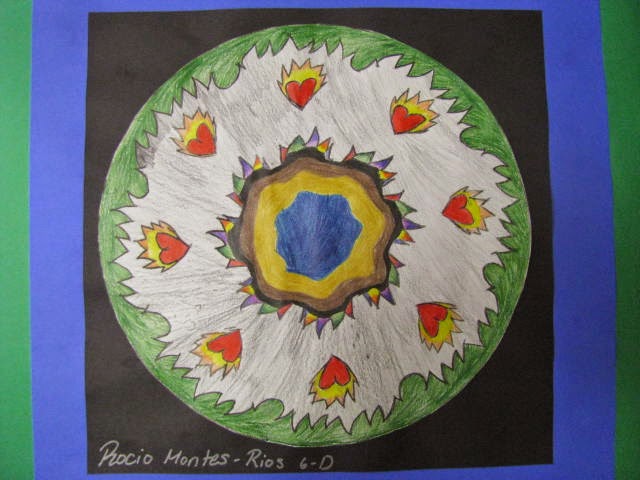
My sixth graders are studying India right now (if you want my Smart Notebook file for my Indian unit, click here and look for the one entitled "Art and Culture of India").  One of the projects I have them do in this unit is mandalas.  I've tried it several different ways, and this is the way that works the best for me (not necessarily the best way by any means).  
I start out by giving them each a triangle/pie piece that I've made and copied on the copier (it's 1/8th of a circle that will fit on a 12 x 18" paper).  Using compasses (I ordered new safety ones that I LOVE), students mark four lines, two close to the point and two further away.  The then draw two lines connecting the marks they made and one shape, like this:

On this one, you can easily see the compass marks
on the lower line.
Or like this:


In the photo above, you can see the next step: cutting along the sides and leaving an edge along the top.  I'm so serious that they follow these directions, that if they cut the top off I make them start over [which I never do, so they're shocked when I recycle it and have them start over].  Then they choose an oil pastel to color the back:


It's important that they color a nice, thick layer, because this is their pattern for tracing:


It's very important that they start on the edge of the paper, or they might not have enough room.  Trace once (being sure to trace that upper line/top of the circle), move it and match up the lines, trace again, move . . . They can trace about three times before they have to re-color the back of their triangle with oil pastel.


After the tracing's done, they start coloring it symmetrically with watercolor pencils:


Confession: I use watercolor pencils because some color so slowly (or are so busy being social sixth graders) and some are so fast.  Watercolor pencils level the playing field a bit with the "add water" step (some get to it, some don't).  Here are a few "in process" mandalas:

They were allowed to add things for interest with
the watercolor pencils as long as they stayed symmetrical.


A close-up of her value shading.
When most students were done coloring (and I was gone, so a substitute was there) they cut them out and glued them to black.  A few got glued to more paper for display in our offices (we have three) or libraries (we have two).


For me and my students, this is just a good successful-for-everyone lesson that also reinforces some math concepts and teaches them a bit about another culture. 
Teach on, friends, the end of the year is so close now!

Wednesday, April 22, 2015

My Four Year Old Refuses To Wear Jeans

My day started out with a tantrum over jeans.  HOW can a four year old who's too sleepy to dress herself feel denim sliding over her ankles?  Anyway, she refused to wear jeans.  And then I had a tantrum, because I hate being late. I hate feeling like I might even sort of be late, it starts my day at school off in a way I do not enjoy. Thank goodness for husbands who dress tantrumy-non-jeans-wearing children.
Then I got to school and saw this:


Yes. YES. YES!!! For eight years, colored pencils in my room lived here:


See the tape? That was to try to stop the colored pencils from falling out the holes, but it didn't really work and kids were getting scratched and cut by the shards of plastic.  I've looked for replacements for these containers for the past several years.  I finally found shelf files at United Art and Education. While I haven't used them with students yet, the plastic is nice and thick, and I think they'll really work great!


They're wide enough for several students to reach in at once, and deep enough to hold lots of pencils.  Quite an upgrade from recycled Laffy Taffy containers:


I was also grateful for bits of masking tape today:

Masking tape marking 3", 6", 9", 12" and 18" on my paper cutter.
My paper cutter is kind of wonky (aren't most?!) and all cutting (if one doesn't want tearing) has to be done near the edge.  One of my student teachers a few years ago put a piece of tape at the 12" mark.  Genius!  I added the others to help with all sort of cutting.  I even have one at 18".  Here's a close-up:


So after all these little Nerd Art Teacher Things that make me happy, I'll leave work to go pick up my non-jeans-wearer.


Pin It