Wednesday, December 18, 2013

Chalk Crayon Symmetry Magic

Third grade is on their art-history-quest, and we're up to Stonehenge.  With Stonehenge, I talk a lot about symmetry.  If you want my Smart Notebook file for Stonehenge, you can download it here.  We do a couple of symmetry projects, and the chalk crayon lift is the first one.  


This is a lesson shared with me in college by one of my professors. (Thanks, Dr. Smith!  I've gotten a lot of mileage out of this one!)  It works like this: students fold a 12 x 18 paper in half (I have them write their name and class code in marker and then turn it over or turn their name to the inside).  Using light and bright colors of chalk, they cover one side (9 x 12 size) with chalk:

Student working--I have them just do a design,
not spending lots of time on anything intricate.
To keep things [relatively] clean, we put our papers in folded newsprint in our folders at the end of class.  Once the whole side is covered with light and bright chalk, they completely cover what they just did with a heavy layer of black crayon:

This one is pretty much done.

A done one with a needs-a-lot-more one.
This is the point in the lesson that you'd better be sure they really like and respect you as a teacher, because the black coloring can get UGLY fast.  Be prepared for lots of whining. But have no fear!  The awesome part is coming, and you'll be their hero again before you know it!  I really keep them all together on their steps (ie, no one moves on to the last step until everyone is done with black crayon), so it's beneficial to have a little "filler" project for the early finishers.
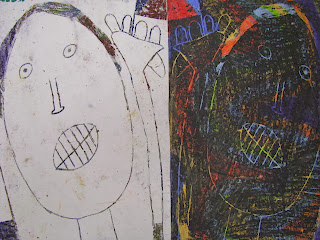
Once everyone has their black crayon done, we turn that part to the inside, and use pencil on the outside to draw a picture (I say no words, but they always sneak some in).  


I have them use fat/kindergarten-type pencils so they get a thicker line, and they have to press pretty hard.  The pressure of the pencil lifts the crayon off the chalk, and viola!


These are really cool, and the students love the final product, but I'm struggling with wanting a specific theme for them to draw.  It seems like there's no "middle" with this project, they're either amazing or a scribbled mess.  We'll see if I think of some sort of theme for their drawing before next year.


Thursday, December 12, 2013

Time to Sleep

I love this book!!!!  And my three year old loves this book, which is why I had to use a library copy in my classroom.  (Our copy had to stay at home to be read nightly)
Time To Sleep by Denise Fleming
It was during one of those nightly readings that I decided it's a perfect book for an art lesson.  I came up with a painting/printmaking/collage sort of lesson for second grade.  


After doing the lesson, I think it's probably more appropriate for fourth grade because it took second graders forever.
We started by reading the book (well, I read the book aloud while they listened) and painting a 12 x 18 paper red using tempera block.  Then we used paste (had to be paste, believe me, I tried tape, glue stick, just holding. . .) to glue a few maple leaves to our painting.  We then painted over/around them with yellow liquid tempera, and learned the hard way to peel the leaves off before the paste dried.  Next we added hills and grass (second grade grass, NOT kindergarten easy fringe grass) and talked about hibernation.  I made a little Smart Notebook file that you can get here--just download the one entitled "Hibernating Animals".  It's got a "What Do We Already Know?" page, a page with a short video clip and a couple of songs, and a page of photographs of animals that hibernate.  


Sheesh, I wouldn't want to run into this skunk!


Then we drew some animals that hibernate on white paper using oil pastel (I had them draw them with red or blue oil pastel, so they'd be similar to the style of illustrations in the book). Oh! and we did another day of pasting/painting around leaves on 6 x 9 red or orange construction paper with blue paint--those got collaged on at the end.
Lastly, we put it all together. 


Shot of the hallway display.

Close-up of a well-drawn skunk.

Love how the snail is BEHIND the grass.


WHEW!!! It was a LOT of work.  
Here's what I learned: one person cannot gather enough maple leaves for 80 children to each have 4 or 5 (send out an email and ask for help), maple leaves need to be pressed otherwise they get too crunchy/dried out to use in printmaking (and you can press a whole plastic shopping bag full at a time, they don't really need to be all sorted out) and when paste dries it looks a lot like frost (at least, that's what I told them so they'd stop complaining about the gobs of paste on their papers). I also learned a little more about hibernation than I knew before--but aren't we all lifelong learners if we're teachers?


My example that's been on the board for what seems like
months while we work our tails off on this project.


Wednesday, December 11, 2013

How's that Jasper Johns Project Coming Along?

Why, just dandy, thank you for asking!  This goes along with our four artists unit in fifth grade.  You can read more about it here and here.  I've done several Johns projects in the past, but this idea comes from another art teacher in my district (thanks, Brea!).  After learning a little about Jasper Johns, students fold paper making 8 rectangles, and draw out their birth date in this fashion: two numbers for the month, two numbers for the day and four numbers for the year.  Here are some drawn out with a bit of painting done:


Born in 2003, man, I'm OOOOOLLLLLDDDDD!!!!


Aw, a Christmas baby!
I had them turn their papers over and write about complementary and analogous colors on the back (like, the definitions).  Then we talked about what do you want people to notice?  The month and day of your birthday? Or the year?  That helped them decide which row was going to be complementary and which row would be analogous.
My first class is done:


I gave them both primary and secondary colors of tempera, but they mixed their own intermediates.  This first group did a fabulous job, and their understanding of the learning target (like how I snuck that in?!) really shows [for the most part].  The group that's finishing now is a different story. We'll be doing a little peer evaluating before we paint next time.
Oh, and I also had them add a "When I did this project I learned:" strip along the bottom of their painting.  Here's a few more from the hallway:


We also had our staff breakfast with Santa last weekend, so Brea was in my building.  I told her how great they turned out, so I hope she had a chance to see them!

Tuesday, December 10, 2013

Door Decorating Contest and A Quote a Day

We're having a winter door decorating contest at my school right now.  Here's mine:


I'm still on the fence about adding scarves on
my snowmen.

The snowman props came from a "Famous Artists"
mask kit that I ordered several years ago
but haven't used with my students yet.

I decided to participate at the last minute, and put some paper up Friday after school, then came up around 8:30 on Sunday night to add my snowmen. I cut out the letters just before my first class, and one of my recess helpers helped me get my words on during my plan time.  Winners will be announced sometime this week.  I don't even know what the winners get, but hey, it was fun to do!

On a totally different note, it's come to my attention that an administrator in my building told a fourth grader to "put those crayons away, no one ever got to college coloring" while she was illustrating a sentence in class (which, I may point out, was the DIRECTIONS GIVEN BY THE TEACHER).  Rumor also has it that this same administrator (we have three) will not allow his own children to own crayons or color at home.  My husband was LIVID when I told him this and got all angry about it. (He's a perfect art teacher husband, I tell you, passionate about my life's work!) I think it's rather interesting and a wonderful teaching moment.  So, today I looked up art advocacy quotes.  I found many I liked here.  I copied and pasted many that I really liked and made a word document.  Every day for as long as I can, I'm going to put a quote in his box with two or three crayons.  I want to get him thinking before we have a full-blown conversation about it.  I don't want him to know it's me doing it for a while. . . so if you're a staff member of mine, don't tell, ok?? (I don't really think they're reading my blog daily/weekly/or ever, but it never hurts to put that out there!)  We'll see if I can get him to change his mind, or at the very least, fill his mailbox and office with crayons!  

I'll let you know how it goes: both the door decorating contest and my Quote a Day Subterfuge.

Monday, December 9, 2013

Kindergarten Rainbows

This is a lesson I found on the internet many, many years ago and printed out (back when I used to print things out, so. . . 2005 ish???).  


When I went to look for it, it had moved to this site.  I did the Roy G. Biv paintings lesson submitted by Denise Pannell.  I also video pure'd the song before I showed my kindergartners, and that is here.  


Painting before it was cut.

Another pre-cut rainbow painting.

Our apple-shipping-crates turned paint pallets were SO pretty!

I used this lesson for practicing cleaning brushes between colors and then for cutting and gluing practice. 


This rainbow belongs to a friend who wasn't making responsible choices
when we started, so his first two colors are in marker.
When I saw he was being responsible, he was allowed to switch
back to paint for the rest.

I also like how much our fractured rainbows are brightening our halls during our dreary weather!


Pin It