Friday, November 2, 2018

I Could Use Some Time To Sleep

I adore books.  I loooovvvveee picture books, I love reading to children.  Denise Fleming's Time To Sleep is a book I've been reading to my own kids for over 20 years (this isn't unusual when your children are 18 years apart).  I made up a project to go with this book years ago but it took forever.  This year I'm trying to get all/most of my classes done and ready for our March Artome' show by January at the latest, so this project came back at half size.  
To begin, we collected leaves that hadn't turned yet (read: are still green and not crunchy).  Next, we used papier mache' paste to glue them to paper.  Each student got one 9 x 12 piece of paper, and one 6 x 9 piece of paper.  I stacked the entire class together and put a book on top so they'd dry flat.  Confession--I didn't try it before hand, so I had no real idea if this would work or not, but it did, with only minimal sticking.

Papers after they'd been stacked.
The next time second graders came to art, they painted their papers, so their leaves acted as a resist.  One page was painted blue, the other green or violet.  Then the leaves were peeled off.  This was super-duper messy, and the kids L. O. V. E. D. it!


These were allowed to dry, and after they came off the drying rack, I put them under books again.

Fresh off the drying rack, pre book squishing.
At some point, we read the book.  If they were super fast cleaners and had extra minutes at the end of the class, or if they needed calming down.  I also had a little/short video about why animals hibernate that I found (I think it was on TeacherTube).  Students used 6 x 9 white paper to draw an animal who hibernates with pencil (they would later color their animal with oil pastel).


This worked well to keep everyone somewhat together, because they had something to work on as I was passing out papers for them to collage for their backgrounds.  Their 9 x 12 painted paper was their base, and each student got a violet and green strip to add a hill with shadow, grass, rocks or similar items.  They then cut the 6 x 9 paper, leaving a "halo" of paint around their leaves:


Finally, they cut their by-now-fully-colored animals and added them to their papers.  Only one class is done so far, but so many of them are GREAT:


I think teachers should also hibernate, I know I could use a very long nap!

Thursday, October 25, 2018

Trying Tapigami

At the last conference I attended (a few weeks ago) I was introduced to tapigami.  Which is art made using only masking tape.  I showed my sixth graders a video from YouTube, gave them some tape and scissors and about 30 minutes:


These are by no means finished, we've just started.  And it's part of a bigger unit on environment, so we'll be working on them for a while.  When students are satisfied with their creations, they'll put a layer of Mod Podge on them to seal in the stickness. 
We're always looking for something new, right?  So go google tapigami and have some fun!

Thursday, October 11, 2018

Wild Beast Landscapes

My fifth graders started the year learning about fauvism, and we've been working smaller than normal (9 x 12 vs 12 x 18).  Mostly because I know my Artome' show is in the spring and I want to be R.E.A.D.Y. this year (no desperate last minute gluing at 10 pm the night before it needs to be mailed, or at least LESS desperate last minute gluing).  I'm also taking an online course for graduate credit to update/better use Schoology, which our district uses for online things rather than Google Classroom.  It's really forced me to think about what students are doing, what leads to what, etc.  All that being said, this is our last paper fauvism project (I still have a digital one for them to complete in my online fauvism folder, but that's more a leading-to-cubism assignment).
Student used ONE COLOR of Mr. Sketch markers to draw a simple landscape, and then traced their marker with glue:

Ugggghhh, sorry it's sideways.  This is an example of
the appropriate amount of glue (and that line going through the
tree can/will be fixed later with paint).

This is an example of WAY TOO MUCH glue.

The biggest problem at this point was having a totally flat surface for drying (drying racks angle too much for some) and drying time (it's been super-duper rainy here).
Once they dried and their glue was all colorful (it pulls the marker out and changes the glue color) we used liquid tempera to paint them wild colors:


They're really beautiful, and even the ones that were a little muddied are pretty great:


Not everyone fully finished, so we might still add some oil pastel details.  Or not.  We'll see what this wild beast of an art teacher feels like doing this afternoon!


Monday, October 8, 2018

More Painting With Kindergarten

Ever have one of those years that a certain grade level is just rockin' the whole school thing?  Kindergarten is that grade level for me this year.  They're listening, they're learning, they're engaged. And we get oh-so-much-done because of it. Bonus: they're great little cleaners!  
Today we used cake tempera paint to paint a tree:

Hmmm, little paint drip in the grass,
we'll turn you into something later.


After painting we read Lois Ehlert's Red Leaf, Yellow Leaf.  When they come back to art, we'll use regular tempera and our fingers to print fall leaves.  Maybe I'll even remember to come back and update this post.  Even though I didn't remember until just this second that I wanted to do these on 9 x 12 paper for our Artome' show in the spring.  SIGH, it's just a whirlwind some days!

Friday, September 28, 2018

Sometimes Keeping Things Pays Off

Four years ago, I made gelatin plates with my sixth graders.  And it was a disaster. Of pretty epic proportions.  So, of course I swore I'd never do it again.  But being the hoarder being the art teacher that I am, I shoved them in a box.  Today my sixth graders needed to Gelli print over some contour line drawings, and I only have five real Gelli plates, so I pulled them out of the box I'd shoved under a table, and you know what?  Those homemade (school made???) ones still work!  They were still in one piece, and there was really minimal shrinkage.
Of course, they needed to be melted down, and I made a tiny disaster of that, but still!


Old gelatin plate that I pulled apart with my hands for microwave melting.
Pulled apart pieces in a little plastic container that once held some kind of cards.

After melting.  Notice the spilled drip.
Can't wait to get these (newly melted and then set back up) out with my students next week!

Wednesday, September 26, 2018

Some Days There's Nothing Better

I have kindergarten last.  Now, I know some art teachers don't like having kindergarten as their last class, but I love it.  If I had my way (I'd win the lottery, but that's a totally different topic) I'd always have kindergarten last.  After recess.  Maybe I've just been doing this for too long and I've totally lost my mind, but having kindergarten last is where it's at.
And some days, it's just fun to paint!


We folded our papers in thirds (that takes a minute with five year olds) and then painted primary colors, learning how to rinse and dry our brushes between colors:


These will be used for a fruit still life that we'll make next time, but for now, the sweet sweet scent of tempera paint fills my room.

Thursday, September 20, 2018

Hall Displays are Up and Running

While I love the "newness" of a new school year, I'm a typical artist/hoarder and dislike the blank blank walls.  I try to get student work up as soon as I can (and I've already taken some things down and replaced with another grade level).  Here's what the halls in my school look like now, on the sixth week of school:

Construction paper 'flips,' fifth grade, Matisse inspired.

Color wheel clowns, first grade.

George Caleb Bingham inspired landscape paintings, fourth grade.

More landscapes, I love the color mixing on the bottom left.

More construction paper flips, and
some kindergarten Mondrian lines further down the hall.

Dairy Delight Dogs, second grade

Lascaux inspired cave paintings, third grade
I've been trying to keep up with kindergarten, and we're doing color scheme giraffes.  When I was gluing them together to get ready to hang, I noticed this:


I don't know that I've ever seen a more prime example of a reason to re-teach  a concept in my life.  Good thing I've got six and half more years with them to get them to understand primary and secondary colors. 

Monday, September 17, 2018

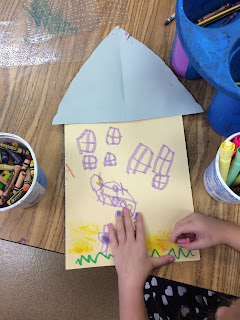
Kindergarten Inside Outside Texture Houses

How do I make it through kindergarten every year?  It's mid-September and I'm already wondering what to teach.  Their attention spans are just so short, I feel like I'm always struggling to stay one step ahead of them.  I'd written "Texture Neighborhood" in my planner and had my example out (draw houses and a street with marker, color with crayons and texture boards) but then I went to my other school and the art teacher there started showing me these houses that I had shared with art teachers in my district a few years ago.  Which I'd totally forgotten about, so I just crossed out neighborhood  and wrote "house" instead.


It is a fun one day lesson.  Each student received a folded 12 x 18 manilla paper, then chose a 9 x 12 color for their roof (choices were gray, black or brown).  Students had to fold those themselves, then use marker to draw one line from one corner to another (diagonally).  When they cut the line, they had one large and two small triangles.  They glued the large one on top to be the roof.  Then they used marker to draw things like windows and doors.  They could open their house and draw the inside:


I then explained texture and showed them the magic of texture boards.  It never ceases to amaze the kindergarten crowd!  Here are some more quick photos I took while they were working:


Why do they draw stick people? 
I thought it wasn't a developmental thing at this age.

It's always interesting to me the ones who don't really
understand the inside/outside concept.
While they would've looked amazing up in the hallway, I've already filled my allotted space up.  I let students take them home the same day they made them to brighten up their refrigerators at home.


Friday, September 14, 2018

Faux Stained Glass in Fifth Grade

This is a lesson I blogged about years ago, and you can read that post here.  My fifth graders are looking at/learning about Fauvism right now, and we did two little/quick Matisse lessons.  One was a construction paper "flip," and the other was a stained glass lesson:


Several things were different this time as opposed to years ago.  I learned that the pre-mixed black glue doesn't work for the peel off--it's too brittle.  And, student attention span seems to be shorter than ever.  (Or maybe I didn't give great directions????)
So, in case you didn't read the linked post, I had students do a pencil design on paper in their sketchbooks:


And then we laid overhead transparency film on top and traced the design with Sharpie, then black glue:

I rescued this one from the trash, so that's why it's a little beat up.
Finally, we added colored tissue paper with watered down glue:


This is the side students work on, which is essentially the back.


This student was unhappy that her glue line ran.


I really hope they all made them home in one piece and that they've got them up in their windows!
Pin It