Sunday, November 10, 2013

Hallways, OH, those HALLWAYS


It's always from this time of year on that I feel so much PRESSURE about the hallway displays.  See this picture?  Those paper people (lesson can be found here) will stay up all year (I take them down the last week of school and return them).  The statues of liberties look great, but I'm putting up new fifth grade stuff, so they kind of need to come down. And at the far end are our first grade owls that are so adorable that I really don't want to take them down yet, although they've been up so very long. This shot is from right out my classroom turning right.
Coming from the main office down the ramp to my room looks like this right now:

Fourth grade mural STILL UP.  Embarrassing, really, how long they've been up and a lot of students drew Halloween things (their own choosing), so REALLY, ENOUGH ALREADY.

 
 And the other side of the hall, some of the new American Gothics going up slowly as third grade half persons, half animals slowly come down.  Several years ago I stopped taking stuff down until I could simultaneously put new stuff up because the blank walls are just SO BORING.  Down at the end are some Japanese Sumi-e scroll paintings that we did in sixth grade that I never found time to blog about.  It's just so much.  Like, all the time, while I'm still trying to be the best art teacher I can be.

I don't mean to sound ungrateful, because I know all teachers have stressors.  Believe me, I wouldn't want to be a classroom teacher, I think I may be allergic to all the testing they're doing.  And I really don't think that's what best for kids. And principals are under so much stress for all the new stuff they're supposed to be learning and implementing.   The past few weeks, I've had kits from our local art museum, where third grade worked like archeologists and sixth grade's been exploring the China kit so I invited administrators (we have three), health room clerks and counselors NINE TIMES and NO ONE CAME.  I was complaining to my husband about it because it's the first time in 14 years that NO ONE came and that's when I realized it's all just too much for everybody.  Is this really good for students?  To have all the adults in the school this overwhelmed? Or is this just a growing pains phase that we'll get past?  For my students' sake, I hope they're growing pains and we'll get past this.  I hope and pray this is not the new normal.  I really sincerely try to keep students' best interest at the forefront of my mind in everything I do in my class, but it's so very hard with all the district and state pressures.
Maybe the hallway displays aren't the worst problem to have after all.

Friday, November 8, 2013

Pollock, Thiebaud, Johns and Steeeelllllllaaaaaaaa!

I know I say this a lot, but I LOVE the projects my fifth graders are working on now.  (I also promise that if you met me in real life, you'd find I'm not a gushy/lovey/sappy person generally, I just really enjoy what I do).  


So I gave them a little overview of Jackson Pollock, Wayne Thiebaud, Jasper Johns and Frank Stella.  They took notes in their sketchbooks as I "lectured" (ie, told fascinating stories about each artist, including the very embarrassing time I met Wayne Thiebaud and found out he wasn't nearly as excited to meet me as I was to meet him).  


As we took notes on each artist, I'd show them a little one page slide about them just so they could see a photograph of the man and some of his work.  It's really not an exciting SmartNotebook file, but if you want it, you can get it here, just find the one entitled Pollock Thiebaud Johns Stella.  That was the whole first day, just background info on all four artists.  The next time they came to art, we opened the Pollock Thiebaud Johns Stella file again and watched the video of Jackson Pollock painting (it's video-pure'd linked to his slide).  The first group I did this with is WILD.  Like, crazy-behaviors-half-of-them-are-on-behavior-plans-with-their-teacher-who's-great-and-taught-20-years kind of wild.  I had them CLOSELY WATCH the video clip and watch how he poured and dripped paint rather than flung it.  Then I gave them paper with their names already on it and cups of paint with craft sticks.  We did have to water the paint down a bit. 


 I was so IMPRESSED with how well they did!  Really, they did SO GREAT! I also love how they're all so different, even though it seems so simple and like they'd all look alike.  But they really don't, and I can really see some of each student's personality in their painting.  Is that weird? 


The next time they came to art, we started Wayne Thiebaud Cloud Clay/Model Magic cupcakes.  The first day we got bottoms of cups (leftover from a third grade papier mache vase project) and used 2-3 crumpled paper towels and tape to make a sort of armature to build on top of:


.

The next time they came to art, we added our cupcake tops.  I'd told them to really think about and look at cupcakes before they came back, and I was so happy with the results:


And a few individual shots, so you can really see how amazing they are:


One final shot of cupcakes in the display case:


I just put them up this morning and I've already got several compliments on them (ok, OK, so I may have led people to them and sort of forced the compliments, but I'm accepting of compliments however they come).

Next art class, we'll start some Jasper Johns numbers paintings and then a really cool Frank Stella minimalist/circle/moving painting.  Can't wait!!!!

Thursday, October 31, 2013

New American Gothic Project LOVE IT!!!

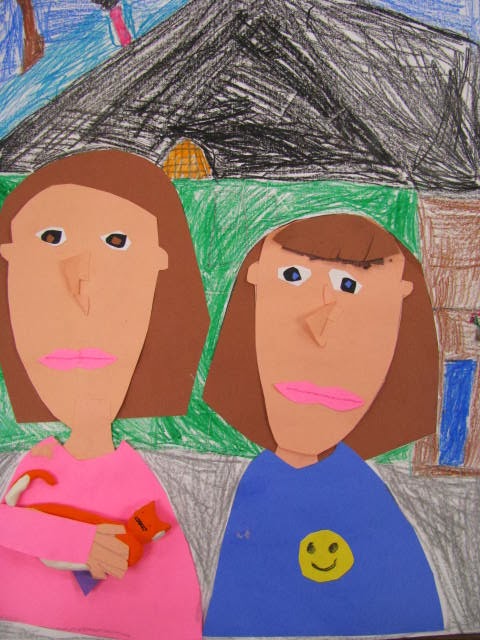
Fourth grade is finishing up their regional artist unit with the life and work of Grant Wood.  They've all seen versions of "American Gothic", so it's always fun for them to learn the real history behind the work.  I've covered Grant Wood before, and for years I had students draw their own versions and color/paint them with oil pastel, but one night when I couldn't sleep (which happens more often than not lately), I came up with this new lesson. 


Day one, background info about Grant Wood (I do this along with George Caleb Bingham and Thomas Hart Benton, then just refer back to those notes we took when we get to Grant Wood).  First working day: we draw our houses REALLY BIG on 18 x 24 inch paper, and use crayons to color them.  Next working day, we start making ourselves and a family member out of paper.  


Pop-out nose.

Heads with necks.

Another pop out nose.

Student drawing the hand that they'll add to their sleeve.

See how they could choose different shades for their different people?
 I encouraged them to really think about the color/shade of themselves and their other person.
The paper people took several days--we added the rest of the faces, hair, shirts and things to make them look the most like the people.


In process of adding features and clothes.

I showed them the easy way of adding shirts:
a simple snip and fold to make collars.

This is a student and his dad, who IS bald with bigger eyebrows!

I love this one so much (it really looks like him!)
that I took a photo and emailed it to his parents.
I had to really push them to finish their people and glue them to their house/backgrounds so they could add their item made out of Model Magic.  Oh my goodness, I don't know who was more excited, them or me.  It was wonderful and happy and downright giddy in my art room on the make-your-item-you're-holding-day. They had to think of what would be interesting and tell something about them when they thought of what item to make.


Ipod or phone?  Not sure, but electronic gadgets were the
CLEAR FAVORITE with this group.

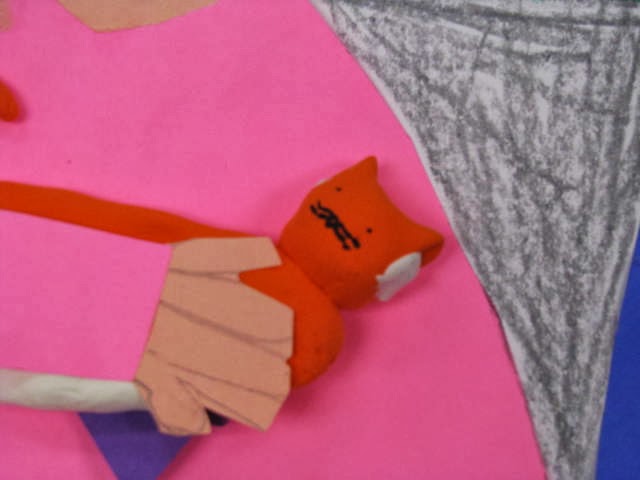
Holding her kitty.
Close up of kitty with Sharpie details (turned and I can't get it to fix).

Pretty sure this one is an ipod.

Close up of her ipod.

Holding his DS.
Close up of his DS (turned again, of course!)

Love her flower--she's a really sweet girl, too!

Close up of her flower.
She decided it needed the leaf after she'd made it,
and came back for more model magic.

Love this one, because IT'S SO HER, I love how she combined
paper to make light and dark brown hair.
Another kitty close up. I didn't have any grey or black Model Magic--
students had to make it using marker.


Oh, and I used a combination of Model Magic and Cloud Clay (because I had both) but we liked the Cloud Clay better, it was a little softer and easier to work with.
You guys, these are totally adorable and I love them. I can't wait until the other two classes are done and I can hang them up in the hall!

Wednesday, October 16, 2013

Color Review Birds


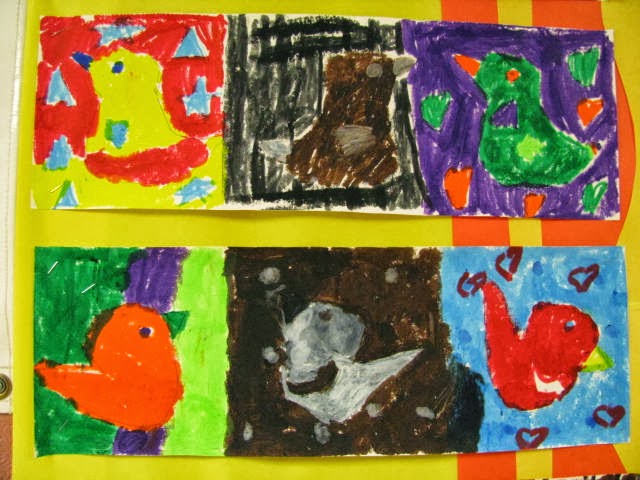
Color review. Color review. Co-co-co-color review.  I don't know why I want to white-girl-rap that, but I totally do.  This is a total REVIEW lesson.  As in: second graders, we all already KNOW THIS.  I know you know this.  Please, Dear Jesus, let them show me that they know this.  Now don't look too closely at the above picture, or you'll see there are a few that need further review.  
I made this lesson up for several reasons: we need some review of our primary, secondary and neutral color schemes AND I got these new Playcolor paint sticks that I wanted to try out.  To see them, click here. If you'd like to purchase some, you could click here, here or here (I get nothing for recommending them, I just like them a lot).
We started out by using the Smartboard and doing a lesson called 'Let's Explore Color!' that I got from the Smart Notebook Exchange and tweaked to suit my classroom.  You can download it here, just look for the 'Let's Explore Color' one.  I found I use this file often, as it lends itself to many types of color review.  After we reviewed color schemes, we wrote them down in our sketchbooks.  We wrote primary colors and then listed them, writing the color name IN the color (wrote red with red crayon, blue with blue, etc), secondary colors and listed them, neutral colors and listed them (writing "white" in black, otherwise we couldn't see it).  Then I gave them a 5 1/2" x 5 1/2" piece of cardstock-y sort of paper that I had, and had them draw a bird, making sure to touch most of the sides (no teeny-tiny super-skinny birds).  After I checked them, they cut them out and traced them onto 6" x 18" paper that they'd folded into thirds:


The folding took a bit of work, "thirds" is a hard concept for many second graders.
I had a couple who thought they knew where this was headed
and they ended up with four spots instead of three.
 After our tracing, I let the students color their cut out birds with marker and take them home.


The Smartboard review, drawing-a-bird-tracing-the-bird-coloring-the-bird took one 40 minute class time.  The next time they came to art I had them tell me what we did and what the color schemes were (in case I forgot, you know).  We then got out our folders and our traced birds and our sketchbook notes.  I had them work with their open sketchbooks right next to their drawings so they could double-check.  Each table of four students got one of every color from the class pack except pink.  The coloring took all of two 40 minute class periods, and it really took some thinking when you only have four colors to use and you want to make it interesting.  Here are a few:

Love the primary bird on the top--he took some time on that one!

I love how the secondary one on the bottom almost glows or vibrates.

Something about these birds looks a little haughty, don't you think?
I took this lesson to my Art Teacher Camp (Fall Conference) drag-n-brag this past weekend and someone said "oh, I just love birds, don't you? I do a lot of birds" and I guess I do too!  I never realized it before, but they lend themselves so nicely to all things color, and shadows, and silhouettes . . .I'm actually going to work on a new Smart Notebook file for yet another bird project right now!
Happy art teacher-ing!
Pin It