Friday, December 21, 2012

Wait, No Paint!

So, one day I was in line at the public library waiting to return my books and saw a child return this one:


I was smitten.  It's wonderful, adorable, genius!  Not to mention perfect for the art room. In a nutshell, it's the three little pigs, but the illustrator has a major role and chaos begins when he runs out of red paint. Kids LOVE IT!  It's funny in a humorous way that kids enjoy (the wolf hurts his nose, one of the pigs is painted to look like a clown. . .)
After I read the book to first graders, they make their own pig on 3" x 4" tagboard (I lead them through "draw a circle", it's the tummy, "draw a circle on top", for the head. . . )  Then we cut them out and trace them onto 12" x 12" white paper three times. This usually takes one class period.  The next time they come I give them a 6" x 12" white paper, have them fold it in half and draw a line from corner to corner:


They then cut on the line they drew and end up with three triangles: one big, and two little:

I always have extra ready for the few that mess up somehow--
keep cutting, don't keep it folded, whatever.
The big triangle is the roof for their house, one of the little ones is cut into a rectangle to be the chimney, and the third one is theirs to keep or recycle.  We glue our roofs and chimneys on, then use our pencils to add details to our pigs and houses.  Later, Sharpie marker is added and they paint with tempera blocks that have NO red in them.  Love these!

All these months of blogging, you'd think I'd learn how to rotate
a picture, but nope!  Anyway, Batman pig is on his head--
a creative solution to his not-enough-space problem.


These pigs are sporting utility belts and some top hats!
This friend obviously didn't trace his pigs (note the size difference)
but I LOVE his thinking--everything he did was for a long, first-grade-boy
reason, and all of them were adorable.
This is a closeup of a pig in high heels.  I know some parts
of it look pink (which we can't have without red), but
rest assured that it's actually purple/violet.
I just think this book brings out so much creativity in them--
see the bikini, the glasses, and the tie?

This is a lesson they always enjoy, that teaches them so much about color without hitting them over the head with it.  Oh, and the second day (after we glue the roofs on and draw our details) the bonus is that they can color their tagboard pigs and take them home.
So check out Bruce Whatley, I love everything I've read of his (even though I must admit, this is the only one I've read!)

Wednesday, December 19, 2012

Hard Week

It's a hard week for those of us who make our living educating little ones.  Connecticut's tragedy has me very sad and very grateful right now--sad, no devastated, for those having to endure this tragedy.  And grateful I'm lucky enough to spend my days with children who are funny and silly and insightful: sometimes all at the same time.
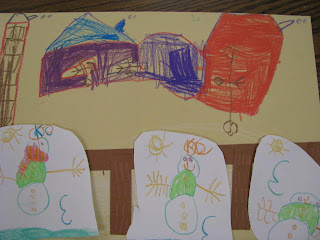
Anytime a child is taken from a parent unexpectedly (and I speak from experience here) the question Why? looms large for months, even years later.  Why would someone take a child from this earth who draws pictures like this:
 Or this:


Because that's what six-year-olds in my room have been working on. Fun little pictures of houses and snowfall with a fence and snowmen. Things six and seven year olds think about when it's cold and winter. 

I've been thinking about and praying for all of those who were touched by this horrible thing that invaded our safe place, our happy memories--elementary schools are no place for savage violence.

I'm also needing to deal with this pile:

Work that needs to be hung up, passed back or filed for the April art show.
As long as I deal with it before it topples over on someone, I'll feel OK about it.
I've been enjoying my students a lot this week, just appreciating them for the little people they are right now.  Because childhood is so very short, and they need to be admired for being the people they are right now.  None of us are guaranteed tomorrow.  Enjoy your upcoming time off, but enjoy today for the day that it is.

Thursday, November 29, 2012

Check out our Cool Cats!

I really work with first graders on colors (primary, secondary, warm, cool) and this is a project I got from a teacher in my former district (Thanks, Judy!) before she retired:


I'm so cool!


Almost too cool for school over here.
 I apologize for not taking photos along the way, but it's been crazy busy around here (and I'm also the tiniest bit of lazy these days).  We start by drawing the cats together using black watercolor marker--I don't tell them what they're drawing to begin, I just have them copy me.  Draw a circle, and they draw it.  Add this curved line, now this straight line, etc.  They figure out it's a cat before we're done.  Then we talk about cool colors and choose them from our markers.  We use dark blue, light blue, dark green, light green and violet Mr. Sketch markers.


My name is Jack, and I'm one cool cat!

I'm AJ and I'm cool, too.
I have a bunch of finished examples because I've done this project so many times, so I put some finished cats up and we talk about coloring all the way, not leaving any white, and using ONLY cool colors.  It takes them about 2 class periods (or a little more) to color them all the way.

Don't be jealous of my boogie.

Heeeeyyy, what's up? I'm one cool cat!
When most of the class is done coloring, we talk about warm colors and make torn paper backgrounds for our cats.  We usually do these on manilla paper.  It's a good time to practice our gluing skills.  When our backgrounds are done, we cut and glue our cats and then add cool details like sunglasses and collars.  I use whatever I have on hand for the collars--this year it was shiny paper from some paper remenants I ordered.  (If you've never ordered paper remenants from supply houses, you totally should, you never know what sort of goodness will be in there!)  In the past it's been scraps of scratch-art paper or metallic paper.  No matter what, the students love it!

I'm sporting a cool hat on my cool head.

I'm Jake, and I'm the last cool cat on this blog post.
After this, first grade learns the importance of all the primary colors when one is taken away (hope I haven't spoiled a future post!)

Monday, November 26, 2012

Fourth Grade and Frida Kahlo

I've introduced fourth graders to Frida Kahlo for many, many years.  I think we've done self portraits a thousand different ways.  These are [so far] my favorite:
I love how serious she looks in her self portrait!

You'd have to know him,
but it really captures some sort of his,
I don't know, essence.


Simple drawings on 12 x 18 paper, using a mirror to look at ourselves, tracing with ultra-fine Sharpie, painting them in.  Then making our backgrounds seperately on 12 x 18 construction paper with construction paper crayons (have I mentioned lately my love for these crayons?).  Cutting out our (dry) paintings, and using simple paper rings (paper strips glued into a circle or ring shape) to make them pop out. 

Trust me when I say, this looks SO MUCH
like her it's almost scary.

People who pass by always comment on this one.


I felt like the students really worked hard, and it showed.  They are very proud of their work and all the younger kids keep asking "when do we get to do that?"
Love the highlighted hair!

A partial group shot.

Another group shot, with our third grade Sumerian paper people hanging above.


Gorgeous, and really brightening our hallways!

Thursday, November 8, 2012

Second Grade Self Portraits

I like to do self portraits in second grade because they're so confident in second grade.  They're so sure they're the best at things, and I love seeing how they view themselves:

I photographed these after they were hung
up, so excuse the background.

She looks a little concerned about something!


These aren't all that big--we start out with a 6x9 piece of white paper, some stand-up mirrors and pencils.  We really look at the shape of our heads and features and spend a day or two drawing.  We trace our drawing with extra-fine Sharpie marker.  Then, I get out the Crayola Multicultural paint (which I love and hate: love because of so many shades, hate because it's washable and the coverage isn't the greatest).  I pull out two or three bottles, lay them next to the child's arm and let them choose their color. We spend a day painting skin and hair.  Another day painting the rest (eyes, lips, clothes and backgrounds).

Love this one!  I have her sister, too, and it's
amazing how similar their drawing styles are.

This is a very quiet girl, and I forgot to ask her
about the violet in her hair.


When all of our painting is done, each student gets a tagboard frame (the cheap-o kind your can order like 400 of in a pack with smaller ones with oval cut-outs in the middle) and writes their name with marker.  Then, as I tape their paintings in, students use 2" squares and construction paper crayons to make a patterned border around their frames.  I like to have these done (or a similar project, because does it ever stay the same from year to year?) by Parent/Teacher conferences, but we were a week or so late with them this year.  No bother, they're brightening our hallways just the same!


The hair is just SO ACCURATE on this one!

He really spent time on his pattern squares,
and it shows!


Friday, November 2, 2012

Owls!

There are owls everywhere these days.  And why not?  They're adorable, full of personality:

Not to mention PERFECT for teaching neutral colors to first graders!  This is a lesson I saw a long time ago on someone's blog.  (so sorry that I can't give credit where credit is due, but I couldn't find it again even when I looked really hard)  I made a Smart Notebook file on owls, neutral colors, looking closely at owls, listening to owls and even watching them via live owl cam!  (If you want the whole Smart Notebook lesson, you can download it here)Then it was time to get to work!

We painted a paper white and splatter
painted brown and black with our
brushes--they did really well.

We painted another paper brown and black
and splatter painted white on (the white
is hard to see).


We made shapes out of manilla paper for our owl bodies:

We also used construction paper crayons
to make night-time backgrounds (not
shown here).
Then we spent days folding our painted papers and cutting out feathers, being careful to overlap them so our owls won't be naked and cold in the dark.  We traced circles onto small white papers and added pupils with Sharpie marker and painted them with stinky paint ("what is this, Mrs. Fresia?" "Just wait!!!").  The next time, we added twisted paper towel branches, orange beaks and feet, and OH MY GOSH, OUR EYES GLOW IN THE DARK!!!  (that stinky paint was glow-in-the-dark Modge Podge).

Face feathers should have been smaller,
but I still love this owl.

This one reminds me of a shaggy dog.
See how it looks like it's landing on the branch?


Someone's feathers are a bit mussed.

Love the perfectly ROUND head!


A few of these are usually chosen for our "Artist of the Month" program, and I like to have the students write letters to the principals (where their artwork will hang for the month) explaining all about their owls and that the principal shouldn't be scared when they see the eyes glowing, but I haven't been that organized this year. 
More adorable owls!

We talked about how the feathers radiate out
from the eyes, and looked at some--I love
how far this student took it.

Great job overlapping and using a variety
of their neutral colored papers to make
their feathers!

Notice that the head is ever-so-slightly cocked.

A group shot--this is about a third of the total owl
population made by first grade.
Pin It