Wednesday, May 21, 2014

Parfleches, Fourth Grade Style

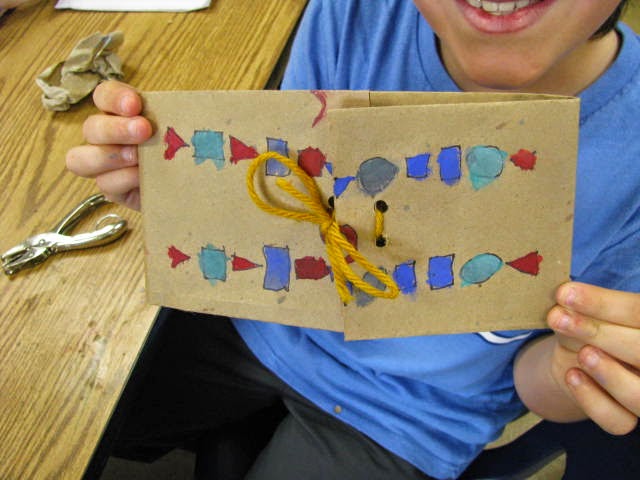
My family and I were at our local art museum a while ago looking at the Native American/American Indian exhibits, and I just loved the parfleches they have on display.  A parfleche is like an envelope/pouch sort of deal.  It's a folded and painted piece of leather used to carry things.  Leather being a bit out of my budget, we made ours out of paper:

  
Starting with a rectangular piece of brown craft paper (the kind you tear off the roll), I had students fold them into thirds, so it was long and skinny.  They then folded the ends to meet.  After that I reviewed symmetry and the students drew geometric shapes symmetrically on their paper (some followed the "geometric shapes" part more strictly than others).

Unfolded to show better where the folds are.

The un-decorated part is the inside.
After their drawings were checked and approved, they used ultra-fine Sharpies to trace their shapes, and then we used tempera blocks to paint them. I totally love the way the tempera blocks (we use the Biggie Cakes) look on the brown paper.  I found some old sets in the back of my cabinet that only has red, yellow, blue, orange, green, black and white: perfect for our purposes.


The painting took two class periods, and I still had a few that needed to finish the next time.  Finally, we used hole punches to punch four holes where our ends met and tied them with yarn.  Again, real Native American Indian ones use leather, and they're probably not tied in a bow. . . 

Students put the ends IN one set of holes and then
came UP the other set, tying the ends together.


If students weren't wearing belts (and most weren't because it's hot and they're all in shorts and t-shirts) I gave them a piece of yarn to tie around their waist.  We experimented with unfolding our parfleche, putting things inside and then wearing them around, and everything stayed in perfectly. This lesson was successful for everyone, and I'll definitely do it again.


Friday, May 16, 2014

Animal Morphs

This is another got-it-at-conference lesson.  Specifically, at "Drag n'Brag" and there was no name on the lesson plan (I looked, trust me).  SOoooooo dang cute!
I apologize for the black bar,
but as a parent, I know I would not want
my child's photo on the internet.
So, I'm just being extra cautious.
I have them start out thinking about what animal they'd be, then draw the HABITAT of that animal.  We use one color of crayon for this.  While they're drawing, I call them back to a blank wall (there is very little of that in the art room!) and have them act like their animal.

She's an indoor cat.

I think he's a dog?  I have no idea what the egg shapes are in the background.
The photos and drawing usually take one class period, but if a class is really focused, sometimes we start painting our backgrounds using cake tempera paint.  They spend another class period painting, giving me time to print their photos.  I use full sheet label paper (basically a big sticker) and the school secretary is kind enough to print them using our color printer.

Love that she made a fish face/mouth in her photo!!!

Giraffe :-)
The day they get their pictures/photos back (they're printed wallet sized), they also get a 6"x9" piece of white paper. I have them cut out their face/hair/neck and then peel the sticker and stick it to their white 6 x 9 paper.  We use markers to color our animals, then cut them out and glue them to our animal habitats.  

Tiger (I think).

This one is so cute, but I had a lot of birds in one class.
I was a bird in my example--ever noticed how some classes
copy the example and some don't?

Definitely a tiger.
These are always a big hit it the halls, but this year they took them right home as schools almost over, and the way most teachers feel about that is. . . 
YEEEEEAAAAAAHHHHHHH!
I have no idea what his animal is, and he
struggles with fine motor, but I LOVED his expression!

Thursday, May 15, 2014

Third Grade Ibis Birds

Our local art museum has an Egyptian sculpture of an ibis.  Ancient Egyptians believed the ibis bird was the god Thoth coming to earth. Thoth is the protector of the dead.  I love this sculpture.  It's so amazing and beautiful. This year I decided to add a new Egyptian project based on this sculpture:


The sculpture at the museum has legs and head made of bronze, and a carved wooden body (the body is a replacement of the original, but the head and legs are original).  I gave each student two black 6" x 6" pieces of construction paper and had them draw their own bird legs and head.  [pausing here for more wonderful photographs]


I did make a pattern for them to trace for the bird body, because I wanted them to be as big as possible.  We traced our pattern on the shiny side of white scratch-art paper using Sharpies.  It was so very hard to check to make sure all students glued the shiny side down! I did have a few who did it wrong, and so sorry, I don't have any extra scratch-art paper: please LISTEN TO THE TEACHER NEXT TIME!  We also learned (the hard way, of course) that it worked best to do all our drawing/tracing/cutting/gluing one day, and start our scratching the next time, after the glue had dried.


Because the ibis bird body (in the sculpture) was carved out of wood, it made sense to "carve" our bird bodies too.  I just told them they had to be repeating lines, shapes and designs.  I adore how they turned out!!!!


This student is an AMAZING student.  Her dad is in school to be an art teacher.

Close up of Amazing Student Work.  She's still working.
This lesson is definitely a "keeper"! They all turned out so wonderfully! (Assuming, of course, that they listed to the teacher and glued the shiny side of their scratch-art paper down so they could scratch off the white to reveal the color underneath.)

Wednesday, May 14, 2014

Ideal Houses Update

Sixth grade will be finishing up our school year working on their ideal houses (or models of their ideal houses). I first wrote about this project here.  As I suspected, it's more of a process-rather-than-product sort of lesson.  

Case in point: I really believe he's learning a lot about constructing his
ideal house, but I don't think it'll be all picture-perfect and Pinterest worthy when he's done.
One class is doing amazing things, and there's such a great energy in the room as they work.  They're all really engaged and trying things (takes me back to my art school days).  The other two classes, not so much.  More discipline problems (throwing modeling clay, for example), more "Get to work, please" (looking at you, student just sitting there with no materials like I'm not going to notice), more vegging-out-and-not-being-productive (isn't that how lots of us are the last few weeks of school???)  
I do love how each structure is different and shows what's important to them:

Nature lovers.  These are girls with a PLAN, always.

Collaborative house with a definite LEADER, she knows what she wants
and expects perfection.  Look at the water slide!  She added plants
and fish that are pretty awesome.

Football, anyone?
And they snagged some fuzzy matboard so their house
could have "carpet."
But going back to the disparity in work ethic between classes: what is it? Is it the mix of students? They way the classroom teacher sets up her class environment?  The way I'm presenting the lesson?? If it was not the end of the year I'd be more apt to work to correct this.  But for now, I'm TIRED, friends.

Working with modeling clay to build their houses (and one who
tried modeling clay and switched to a box when he didn't like
how it was turning out).

The Lego crew.  They've rebuilt their houses several times when
they got dropped or knocked off the table.
They're now gluing the bottom layer to cardboard.

Craft sticks, Easter grass and more cardboard.
Today a student asked "Where's yours, Mrs. Fresia?" and I said "My what?" then I realized he wanted to see my ideal house model.  It gave me an interesting perspective on what they think I'd do when I listened to their conversation about how they thought mine would look. It also made me happy I didn't have one at all because I love that they only have ideas in their mind and no idea of what I'd be expecting from them.  I don't usually go example-free, only for certain "special projects".  (ie ones I don't have the time or space for).
Press on, art teachers, the end is in sight!

Friday, May 9, 2014

Asymmetrical Masks = Kinda Creepy Masks


We've been talking about Native Americans (or American Indians) in fourth grade.  Did you know that the Eastern Woodland tribes are really the only ones that used asymmetry?  It's a great math connection for them and I heard from a classroom teacher that their knowledge of this concept has really carried over to their math lessons.  YES!!!!!


They're made with 9 x 12 construction paper and a bunch of paper scraps, including velor paper (just because I love it).  I talked to them a lot about layering, repeating shapes, etc.


So many times the students think, 'well, I made an eyebrow here and a slightly smaller one here, so now it's asymmetrical' and I want them to take it a little further.  I want them to be obviously asymmetrical.  One of our principals came in and walked around one day and said "why are they all creepy looking?" and that's when some of them took a more gruesome turn:


We had talked as a class about how we felt looking at some American Indian masks that looked like this and this. We agreed on words like "uncomfortable" and "creeped out," I just wish I would've had the students answer the principal instead of jumping in.

It was a fun project for the end-of-the-year madness (two and a half more weeks!)


Monday, May 5, 2014

Kindergarten Paints for Moms

This is a sweet little lesson I've done for many years with kindergarten in the spring.  It's based on Picasso's Posies, and I don't remember where I got the idea.  Arts & Activities, maybe?


We start out painting green lines, then turn them into flowers (using cake tempera paint).  This takes one class period.  The next time, I have students choose skin color paper, fold it in half, trace their hand, cut it out (folded, so they get two hands) and add them to their papers, like they're giving a bouquet of flowers to their mom.


My students this year are pretty good with the scissors, so the hand-cutting didn't take very long.  What's a happy art teacher to do?  Provide paper for Mother's Day cards, of course!


I do adore these, and I hope their moms all do to!
Pin It