This is a lesson I thought I'd blogged about before, but I can't find it anywhere, so maybe not??? In the style of Andy Warhol, I had my adaptive students print their hands with black paint on yellow paper:
They then cut them out, leaving a "halo" of paper around the edge (paras drew a pencil line for them to cut on). We then glued those to another paper and cut again:
This glue, cut, glue continued and finally we glued them to black paper:
I wanted them to send me a "selfie" via google classroom so I could print a little sticker in the corner of their papers instead of their names, but only one student has done it so far (this is an adult problem, not a student problem). I'll get some responsible students on it as helpers next week, and I'll get those stickers on there! For now, these papers are headed to our office "gallery."
A happy little blog for a mid-career elementary art teacher who's looking for the positive side of life, teaching, and spending her days with people under the age of 12.
Friday, October 30, 2015
Tuesday, October 27, 2015
Red Ribbon Week
It's dress like a superhero day here for Red Ribbon Week. I made myself into an art superhero!
I did wear it around the house Saturday night and didn't have problems, but today I'm HOT (nothing like some sweaty shoulders). And I'm not that fond of wearing a cape while having very short bathroom/peeing time. Not a good mix.
I was a bit worried the students wouldn't take me seriously, but it really hasn't been an issue . . . maybe I'll wear this everyday!
Monday, October 26, 2015
Fifth Grade and Andy Warhol
I know I probably say this too much, but I'm really loving these!!!!
Here's the backstory to this assignment--our district went to one-to-one electronic devices this year (all students have chromebooks), and while I'd dabbled in Google Classroom last year, I wanted to get better at it this year. This project is similar to one I did many years ago in a different district, except last time I took, edited and printed all the student photos (ain't no one got time for that). Here's what I did: I set up a fifth grade Google Classroom and created an assignment using these directions (let's hope you can access them), then as a group we went outside, took photos and went through the directions all together. When students had a black and white high contrast selfie, they turned it in to me through Google Classroom and I printed them out.
While all that was getting accomplished, I gave them each a large, 18 x 24 paper to fold into fourths. We did bleeding tissue on one fourth:
And then a warm painting on one fourth and a cool painting on one fourth (using the block tempera paints):
All of this work gave me time to chase down absent students or students who didn't actually turn it in correctly.
I had decided to have them trace them on clear sheets, and in a stroke of pure luck (maybe genius?) I happened to ask in our main office if we had any boxes of old overhead sheets lying around. The secretary was SO HAPPY to get rid of them. In the store room there were more boxes than I could carry!!!
Students taped the clear overhead sheets to their photos with one strip of masking tape and traced the black with extra fine permanent marker:
Only a few are done for now, but after tracing onto three clear sheets, I use hot glue to attach the tracings to their papers:
The final step was to have the students glue their photo to the remaining/blank rectangle on their paper. I CANNOT WAIT to hang these in the hallway!
Here's the backstory to this assignment--our district went to one-to-one electronic devices this year (all students have chromebooks), and while I'd dabbled in Google Classroom last year, I wanted to get better at it this year. This project is similar to one I did many years ago in a different district, except last time I took, edited and printed all the student photos (ain't no one got time for that). Here's what I did: I set up a fifth grade Google Classroom and created an assignment using these directions (let's hope you can access them), then as a group we went outside, took photos and went through the directions all together. When students had a black and white high contrast selfie, they turned it in to me through Google Classroom and I printed them out.
While all that was getting accomplished, I gave them each a large, 18 x 24 paper to fold into fourths. We did bleeding tissue on one fourth:
And then a warm painting on one fourth and a cool painting on one fourth (using the block tempera paints):
All of this work gave me time to chase down absent students or students who didn't actually turn it in correctly.
I had decided to have them trace them on clear sheets, and in a stroke of pure luck (maybe genius?) I happened to ask in our main office if we had any boxes of old overhead sheets lying around. The secretary was SO HAPPY to get rid of them. In the store room there were more boxes than I could carry!!!
Students taped the clear overhead sheets to their photos with one strip of masking tape and traced the black with extra fine permanent marker:
Only a few are done for now, but after tracing onto three clear sheets, I use hot glue to attach the tracings to their papers:
 |
| Sorry about the glare, these are really hard to photograph. |
The final step was to have the students glue their photo to the remaining/blank rectangle on their paper. I CANNOT WAIT to hang these in the hallway!
Thursday, October 22, 2015
Oh, Yes, Must Be Parent Teacher Conference Time
 |
| Co-workers trying out our new "selfie station". |
 |
| I was really trying to get the expression right here. |
 |
| Love her expression! |
I've also been meaning to post this latest adaptive lesson:
 |
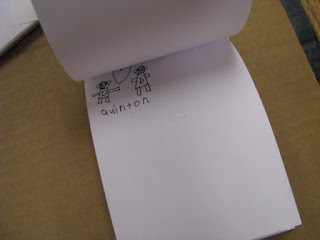
| Quinton drew saying "I love you so much, I'm so proud of you!" It's him and his mom. |
Very simple. I gave each adaptive student a fourth of a 8 1/2 x 11 piece of paper (so 4 1/4 x 5 1/2) and an extra fine Sharpie. I had them write their name (if they were able) and draw a picture of themselves (if they were able). I then was able to lay four on the copier at a time and shrink them down to 70-75%. I then cut them apart and glued or taped them to the upper corner of each part of a piece of copy paper, allowing me to copy four students at once.
I made 50 copies, cut them in fourths and used this product:
The hardest part was cutting the pages evenly and stacking them to paint the Pad/Book Compound on, but then I got this:
LOVE LOVE LOVE!!!!! The students will be making gift bags and maybe adding magnets to the back. I'm hoping for some positive parent feedback because so often parents of adaptive students don't get genuine art work that is truly reflective of their child's ability.
Now, back to funny photos of my co-workers as great works of art:
 |
| Christmas break is not that far away, we can make it!!! |
Wednesday, October 21, 2015
Four Layers of
. . . the rainforest. Surely, you KNEW that was what I was going to say?
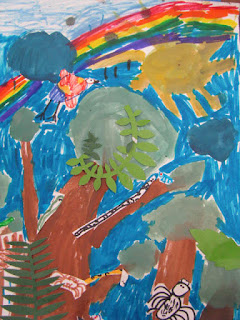
Second grade learned all about the rainforest with a Smart Notebook presentation. I got it off the Smart Notebook Exchange and modified it to meet my needs. You can get it here (find the one entitled, 'Rainforest' and while you're there, get 'Rainforest Animals' too). We spent a class period just talking about the rainforest (we also talked about movies students may have seen like Up). We then painted with tempera cakes (I like the Biggie cakes) on 12 x 18 white paper.
We spent a class period or two painting, and then a couple of class periods drawing a variety of rainforest animals on 9 x 12 paper. I put the single slide of rainforest animals up on the Smartboard, as well as books on every table that I got from the school library. We drew with pencil and colored with skinny markers (more variety of colors in those sets).
Then (bet you saw this coming) we cut and glued our rainforest animals onto our rainforest backgrounds. I had many who did somelazy cutting easier cutting by cutting around the animal rather than on/close to the line. We'll be cutting many more times in second grade, so we will get better at cutting!
Finally we used botantical cuts to add some camouflage and a more jungle-y look:
I also had them glue an "I Learned" sheet on the bottom (literally a strip of copy paper, cut into strips with the sentence starter When I did this project I learned:)
I love that all of these are so different, and as soon as the painters are done re-painting the walls of our school, I'll put them up in the hall. Speaking of different:
In all seriousness, I love it when kids are totally different and marching to their own drums!
Art teacher on, friends!
Second grade learned all about the rainforest with a Smart Notebook presentation. I got it off the Smart Notebook Exchange and modified it to meet my needs. You can get it here (find the one entitled, 'Rainforest' and while you're there, get 'Rainforest Animals' too). We spent a class period just talking about the rainforest (we also talked about movies students may have seen like Up). We then painted with tempera cakes (I like the Biggie cakes) on 12 x 18 white paper.
We spent a class period or two painting, and then a couple of class periods drawing a variety of rainforest animals on 9 x 12 paper. I put the single slide of rainforest animals up on the Smartboard, as well as books on every table that I got from the school library. We drew with pencil and colored with skinny markers (more variety of colors in those sets).
 |
| A tiger on the forest floor. |
 |
| A jaguar hanging out in the understory layer. |
 |
| Red eyed tree frogs are a second grade favorite! |
Then (bet you saw this coming) we cut and glued our rainforest animals onto our rainforest backgrounds. I had many who did some
 |
| Not wild about the cutting, LOVE the sky in this one. |
 |
| Notice the claws on the leaping jaguar. |
Finally we used botantical cuts to add some camouflage and a more jungle-y look:
 |
| I love this one, so JUNGLE-Y! |
 |
| Something about the blue bird is very peaceful to me on this one. |
 |
| This student spent so long on his snake, getting it through the vines. |
 |
| What's not to love here? Spiders, parrots and jaguars, OH MY! |
I also had them glue an "I Learned" sheet on the bottom (literally a strip of copy paper, cut into strips with the sentence starter When I did this project I learned:)
I love that all of these are so different, and as soon as the painters are done re-painting the walls of our school, I'll put them up in the hall. Speaking of different:
 |
| Ahh, a beautiful rainbow! |
 |
| Oooo, stormy skies! Really thinking here! |
 |
| ?????? |
Art teacher on, friends!
Subscribe to:
Posts (Atom)


