Wednesday, December 31, 2014

We've Been Working on These FOREVER

This is a lesson I literally started the students' first day of art class.  I got the idea from Nikki (she and I student taught with the same teacher several years apart, and she presented this sketchbook lesson at a conference.  She does hers with 7th and 8th graders).  Nikki got the technique from our mutual friend Beth, who teaches high school art.  I made a few changes: namely, Nikki used store-bought printed duct tape and pre-printed scrapbook paper, while I had students design paper to cover and used the wet-n-stick tape by Pacon.  The tape really helps in my never-ending quest for more organization.

/This is one class of sketchbooks.  The tape on the binding
corresponds with the color hanging over their tables.
The basics are this: you send out a call for family-sized cereal boxes (be prepared, because you'll get a lot).  I cut mine to 12 x 19/20, depending on the size of the box.  Because I gave students 12 x 18 paper, and the cereal boxes are the book covers, it has to fold to at least 12 x 9, but I like a bit of extra.


Each student gets one cereal box and the color of tape that corresponds to the color of their table.  Their responsibility was to fold the box and then wet and stick their tape.  This had to be done and allowed to dry before the next step.

I don't have a brown table, and there's only one class where
anyone sits at the black table, so I've got plenty of those colors
leftover for another project.

Wetting tape.  When students got enough water on it the glue really
activated making their binding area much stronger.

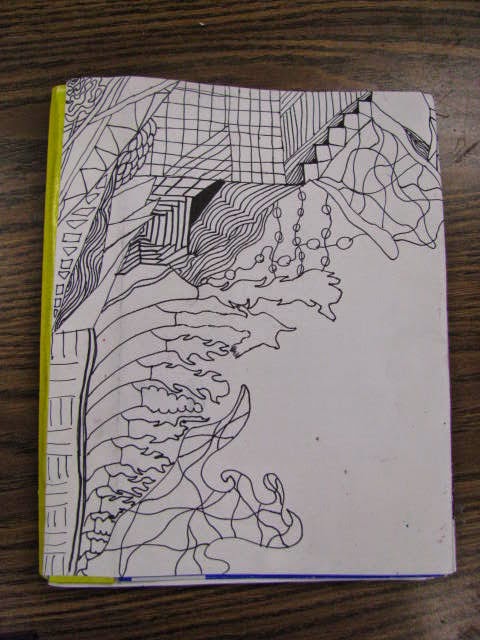
Here is another area where Nikki and I differed.  She had students measure, mark and cut the slots for their binding.  I had students measure and mark, and then took them in groups and drilled them.  While all that was going on, students were Zentangle-ing on 12 x 18 white paper with pencils/extra-fine black Sharpies.  Next they got groups of paper: 3 groups of 4 pieces 12 x 18 white and 2 stacks of 12 x 18 manilla.We use the manilla paper for ideas and thumbnail sketches and the white paper for notes, and "serious" drawings.  These were folded and marked (matching the drilled holes).  Then I gave them some stiff cording to bind their books.  I demo'd this several times and then they helped each other.

You can see the diamond cuts for the binding here, but not
the stitching.  Trust me when I say it's an easy in/out, and all students
were successful with this step.
We added our Zentangle page to one side (over the cereal box) for a cover, being sure to keep our tape showing:


No one actually finished their Zentangle, which was fine,
because they can add to it during any "down time" or
"what-do-I-do-now-that-I'm-finished" time.
After all our super-fun-and-not-at-all-stressful faux Gelli printing sessions we had papers to choose from to be the other cover.

There is only one photo of the actual "finished" sketchbooks
due to being locked out of my classroom with my four year old
one Sunday over winter break.  Fun times.
As with all new projects, there are a few things I'll tweak in future years, but I love that they're totally student made, and we've been using and creating them all school year!

Tuesday, December 23, 2014

Why Didn't I Think Of This Sooner?

Sometimes the smallest little tweak to something can make everything easier, you know?  And here's my tweak for paper weaving:


Amazing, isn't it?  I know, I know, it looks like I just wrote their names on their papers before they got there in the corner.  And that's what I did.  It's just that, next I have them use two crayons: a red (or reddish) and a green (or greenish).


See the beauty of it?  They use the red crayon to draw a line under their name (after folding their papers in half) . . . 


-and the green crayon to draw their lines!  Now it's just like driving a car, cutting (driving) on green, stopping on red! No more checking every single paper before they cut, replacing papers when they cut the edge rather than the middle!  It totally works!!! Why didn't I think of this years ago?!
After Christmas break we'll finish this adorable little project that I got from the ladies at St. Paul's Episcopal Day School (thanks Cheryl for letting me tour) and I'll post some pictures.  The whole writing-their-names-and-using-red-and-green-crayons part just made the weaving part go so much smoother.  And a smoother lesson does make for a happier art teacher.

Wednesday, December 17, 2014

On the Walls in these Halls

Are you ever in an unfamiliar area and drive by a school and wish you could go in and talk to the art teacher?  I think of it almost every time I'm passing a school.  At LEAST I'd like to see what's hanging up in there, see what sort of projects the students are working on.  
Since most of you will never drive by my school, I photographed what's hanging in the halls right now for you to see (you are most welcome!).

Fifth grade presidential portraits and third grade paper people
hanging right across from my classroom.

Sixth grade African masks and more third grade paper people
right outside my room.

New kindergarten Kandinsky-inspired trees hanging in the hallway
from the cafeteria.  Haven't gotten the objectives for this project
posted yet, but I will.

First grade paintings (self portraits) and some kindergarten color
mixing paintings that are being taken down to make room
for more first grade work.
I also have two bulletin boards, which is great but never seem quite big enough:

Sixth grade Adinkra prints (just cut out of sticky-back foam
and printed with marker).

Oh, and we added "stitching" with black Sharpies.
Fourth grade Kahlo-inspired self portraits.  These are great,
but I haven't gotten them all up yet.
Wouldn't it be great if you really could just "drop by" an art teacher some time?  It would probably never work out, there'd be too much going on or something, but it'd be awesome if we could all share more and show off our students' work more. Until the 'open door' policy in my mind comes to pass, I guess I'll keep on reading blogs!


Tuesday, December 16, 2014

Newest (January 2015) Arts & Activities

Have you got your latest copy of Arts & Activities?  Mine just arrived in my mailbox yesterday, and there's a little article in there from yours truly.  I'm soooo excited about it.  It's "Safety Shields inspired by the Plains Indians" and I wrote it 2 1/2 years ago, so the students are all in middle school now.    
We have ugly sweater day here for the staff, and one of my good friends said, "Hey, the prize should be a signed copy of your article!" I thought it was a great idea, but nobody really went for it. 

It's the second time I got an article in, and next time I'd really like to get the sweet cover spot.  Goals, we've all got 'em.  I'm sure I'm driving people in my life crazy with my excitement, but it's a big deal to me.

Art on, friends, only a few more days of Christmas-is-coming-craziness and we can all relax for a bit.


Monday, December 15, 2014

Pattern Kandinsky Trees

I've seen many lessons using Kandinsky's work as a starting point, and I was having one of those don't-want-to-do-what-I-have-planned-for-kindergarten days and came  up with "I'll fold their papers into eight sections and then have them make a pattern--"


I really didn't know where it was going when it began, I just had them draw a pattern with marker and then color the background/white space with crayon.  Some were more elaborate than others:


We then made circles with crayon on 9 x 12 paper.  It gave me an excuse to drag out the ole' document camera (the one I've got from our library is really, really basic).  We drew/colored seven circles:


The next art period, we talked about Wassily Kandinsky, and I made a super basic Smart notebook lesson, that you can get here (it's just labeled "Kandinsky").  The first two times we spent too long talking and making a tree on the smart board so we didn't have enough time.  The final class I realized that if the students worked on their paper while someone was on the smart board, we got lots more done (once we got to the build-a-tree-with-lines part).  I do really like how they turned out:


It really turned out to be a great lesson for reinforcing patterns (that they're covering in their regular classroom), cutting/gluing (almost every kindergartner needs more practice on these skills) and using and manipulating parts to make a whole (ie using lines to "build" a tree).  Hooray for last minute lesson when I'm bored with the same old same old!

Tuesday, December 2, 2014

Glad Mad Sad First Graders

I really thought I'd blogged about this lesson before, so I didn't take many photos because my plan was to link it to the previous post . . . which doesn't exist.  I know the original idea was not my own, and when I find my inspiration, I'll link it, but for now, just go with it, will you? [edited because I found it here on Artsonia]


First grade, talking about self portraits.  I use acrylic stand up mirrors, kind of like these.  They are a bit pricey, but we use them all the time in my room.  They draw three self portraits on three separate 9 x 12 papers, first with pencil and then trace with black permanent marker.  I give them time to make faces in the mirror (just because it's fun).  We look at ourselves with a variety of expressions.  I tell them they need to draw themselves sad.  The next one is a mad face.  I usually write "Feeling Blue" on their sad one and "Hot Headed" on their mad one, but after this year I'll probably drop that bit.


You've probably figured the next part out: we talk about warm and cool colors, and they paint their self portraits.  Cool=sad, warm=mad, free choice/any/all colors=happy.  I only added the happy one this year because students kept asking 'when do we draw ourselves happy?'  I also used to have them glue their sad and mad self portraits to large (18 x 24) paper, but this year I stapled their three self portraits on 2 x 24 strips and I like it so much better.


I also made a quick "The many faces of ____________" paper for them to fill in and glue to a larger piece of construction paper.  Adorable!


I do love the way they all look hanging in the hall, it has a real gallery feel.
Pin It