Monday, September 30, 2013

Kumihimo

Once again, this is a conference lesson find.  I didn't actually go to the workshop, I was in another workshop and a friend showed me this after it was over.  I don't have any information from the conference presenter (sorry, WhoEverYouAre).  It's a simple braiding/cording technique from Japan using 4 colors of string (I use crochet string), 4 strings of each color (16 strings total) and a simple cardboard loom (a circle with 32 slits cut around the side and a hole in the middle).  The very first time I did this lesson I drew all the looms out on cardboard and had students cut them out (pretty successful), but I've also had students do the whole loom themselves (not so successful, lots of sloppy ones).  I do re-use the looms year after year, and even thought about using pizza circles (from frozen pizza) for this, but I've never tried it. (They're much bigger, more of the string would be wasted, but in a time crunch, I would totally do it).

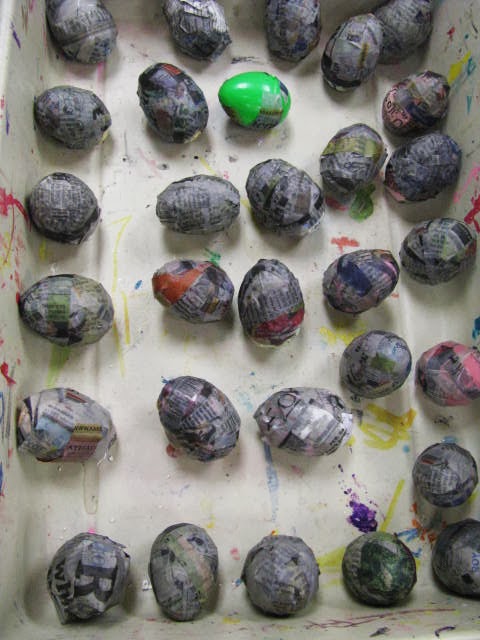
A whole class worth of looms in the drawer.

One of the most in-depth and still user friendly sites I've found on Kumihimo is here.  I have to be honest and say I haven't shown students this site, I only use it for background information for myself (mostly just to look cool by telling them "Ya, really tightly braided cords can be used to tow a car." and "Kumihimo were wrapped around sword handles for better grip." You know, the little things that draw their interest)
The first day that we start this lesson, I draw this on the board:


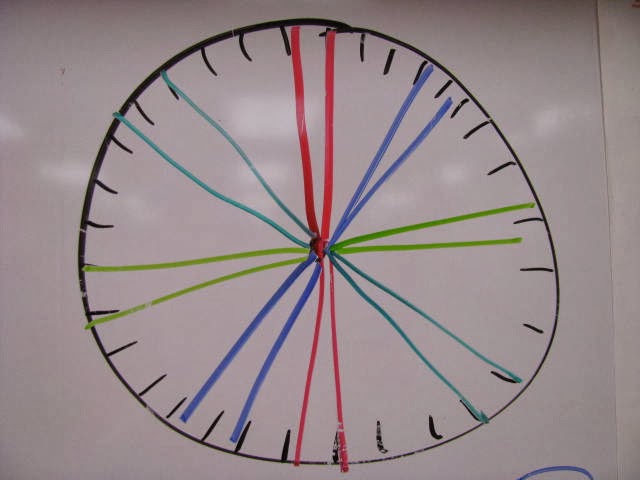
In theory this helps them to know how to set up their braid, and maybe it does more than I think, but this year I realized I also needed to show them a side view, where it looks like a jellyfish.
Once students are set up and ready to go, it's a simple process.  They pick any color to start, and move the left one closest to them to the top:
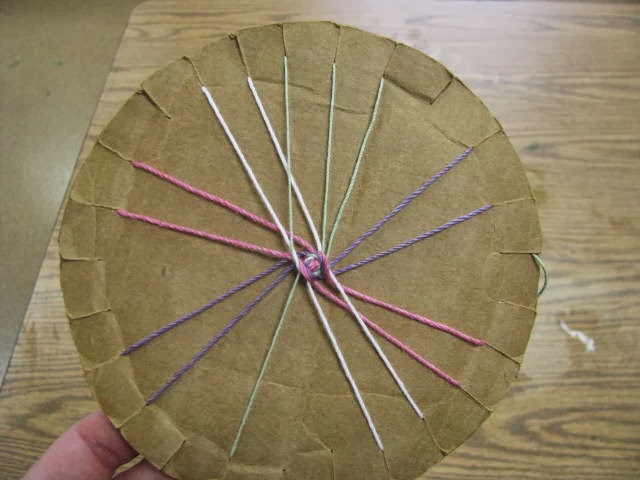
See how there are now three green in a row on the top?
Then move the right one (from the three on the top) down next to it's same color without crossing:

Green are once again two by two.
They then move to the next color (in the example up above, her next color is violet) and do the exact same thing. (Left up, right down, turn to next color).  That's it.  While they're moving strings, a braid is forming from the hole in the middle:

We'll braid until they're long enough to wear around our wrists.  This group seemed to "get it" much faster than some of my past groups, and I'm not really certain why (if it's something I did or just how they are), but it's a little lonely in 6th grade right now, because no one needs my help.

Totally unrelated: did you see Mr. E's post about having children of his former students? He had a walker as his picture along with that post.  Well, my birthday is this week and they announced it during morning announcements and students in my third grade class today said "Are you 59?" to which I said "My MOM isn't even 59, thanks guys!" and then they said "Are you 19?" 
Yep, SURE, I'm 19.
Don't think I can pull that one off with an almost-18-year-old-daughter, but I'm willing to try.

Monday, September 23, 2013

The Smartboard Changed My Life

It really did.  Nothing else in 14 years of teaching has changed my life as much as my Smartboard did.  If I ever switch schools and don't have one, I'll most likely cry.  My most popular post is my Art + Math one, entitled "Totally Cannot Take Credit for This" about Paul Klee's "Once Emerged from the Gray of Night" and math.  I got many requests for my Smart Notebook file, and with the help of my wonderful district tech person, I now know how to link Smart Notebook files to my blog (thanks, Linda!!!)  So from now on out, I'll link my Smart Notebook files!  To use them, simply follow the link, find the one you want and download (the blue arrow).  I only ask you give me the credit if someone asks, and send some good vibes my way (I can use all I can get).  Happy art teaching!

Friday, September 20, 2013

Sometimes It's the Little Things

We were in our art collab meeting on Wednesday morning of this week when one of the other art teachers complimented this:


And then it became a brief topic of discussion. I'd actually already decided to add pencil sharpeners to this area (right by my desk), and was only waiting for my sign to be laminated.  Now, that area looks like this:

So, it's not the greatest picture, but hopefully you can see
the crayon sharpeners at a 90 degree angle to the pencil sharpeners.
Before school started, I just ripped the crayon sharpeners out of five boxes of 64 crayons that I'd had for a while, hot glued them to yarn, and slip knotted (or is that a half-hitch?) them to a laminated sign with holes punched in.  Then I used LOTS of clear wide tape to attach it to the shot file cabinet-y thing by my desk. Bonus that it's over the trash can.  It doesn't totally prevent them from disappearing, I'm sure, but it's worked so far!
Here's a step-by-step:

Made the sign with some posterboard scraps I had, and marker.
Measures about 3 inches by 14-15 inches.
Punched 5 holes, then had it laminated and re-punched the holes.

BONUS! The sign covers up this ugliness!

Close up of the hot glue on the back of simple metal hand pencil sharpeners.
The yarn is about 14-18 inches when folded in half, so, hmmmm,
28-36 inches before being folded.

Just a shot before the pencil sharpeners on their yarn were added.
My last minute advice is to use LOTS of tape.  Tape the whole thing down, then tape between every hole, and over it a bit too.  In the photo above, you can see where a student ripped a crayon sharpener off the very first day (he then tried to innocently say "Oh, I thought we were supposed to take them to our seat" while I just stared at him and let the kids explain reality to him).
Hope this Little Thing makes your art room life a little easier.

Thursday, September 19, 2013

Bingham Seascapes

In fourth grade, we study our regional artists.  For us, that means Thomas Hart Benton, Grant Wood and George Caleb Bingham.  I give the students a quick overview, and they take notes in their sketchbooks.  I even show them the three assignments we'll be creating, and then we start thinking of ideas.  Their Bingham assignment is based on his painting Fur Traders Descending the Missouri.  I want students to draw (and then paint) a water scene where people are having fun.  Here are some of ours:


Busy at work.  I have so many classes painting a variety of assignments at once,
that I started using the egg cartons.  It really saved the getting-out-the-paint time.
Just snap the lid shut and you're done.

More students at work.  See our water cups?  A janitor at my old school got them.
They're made for seed starting or something.  I love them because they're
almost impossible to turn over.
Love the surfer girl!
There were originally people in the yellow tubes,
but she painted over them.
Look at the mermaid on the right.
This student has a "thing" for mermaids!
This is supposed to be a pool in Ohio?!
We don't live in Ohio, so I'm a little uncertain what the yellow lines are.
Love the water on this one.


I love this one. He added a bit more after I took the photo:
flowers on the ground and changed the trees to a darker green
to better contrast with the grass.
This is one of the few almost-free-choice paintings we do. The expectations include: covering all the paper with paint, painting details and mixing a few colors.  Next, on to Benton inspired murals!

Thursday, September 12, 2013

Sixth Grade Does Daruma

Last year, after my Asian Unit was over with sixth grade, I found this lesson from Dick Blick.  It was perfect, and I was so excited, but I had to wait until this school year.  It gave me time to get donations of plastic eggs (just send out an email, you'll be amazed by how many people give you!)


 Then I ordered larger sized metal nuts (like the kind that go on bolts) and began hot gluing. After two classes, I found out it really IS important to stuff the egg with something like paper towel (I used some plastic Easter grass I had leftover).  If you don't, the nut comes loose and their egg won't stand up very well. In this lesson the students make a traditional Japanese weighted toy that symbolizes perseverance and good luck.  Students design a creature or person on their papier mached eggs and leave the eyes blank.  They then make a goal and fill in one pupil.  When they achieve their goal, they fill in the other eye, then keep their toy/creature to remind them of their completed goals.  Just perfect for sixth graders!

First layer of papier mache (newspaper).
I had students write their names on a small piece of tape on the bottom,
you wouldn't BELIEVE how many then papier mache'd right over their names!
Next year, I'm going to change a few things.  First of all, I'll show them some real Daruma, like from here or here. This way, they'll have more background knowledge.  Secondly, I'll have them really think about their goal for a while (I thought I did a good job of that this year until I read some of them. . .) And thirdly, I'll have a few finished examples.  I used to really be on the fence about finished examples, but sometimes they just don't make high-quality work unless they see what's possible.


Weird angled shot of their eggs after
the final layer of  papier mache (with paper towel).
After all our papier mache-ing was done, we drew out our idea with extra-fine-point Sharpie and painted them with tiny brushes and liquid temera.  Here's a few:


Whole class shot--I love the penguins!

Ninja turtle in the works.

Back of the ninja turtle.
Bear with goal.

Aren't they just adorable?

A finished penguin and a penguin in the works.
Sorry for the crappy quality of the photo.

All in all, I'd call this lesson a success, and with a few little tweaks, I'd do it again!
Pin It