Tuesday, April 28, 2015

Mandala Time!

Ooooooo!!!! Aaaahhhhhhh! Nothing better than a colorful, symmetrical mandala!


My sixth graders are studying India right now (if you want my Smart Notebook file for my Indian unit, click here and look for the one entitled "Art and Culture of India").  One of the projects I have them do in this unit is mandalas.  I've tried it several different ways, and this is the way that works the best for me (not necessarily the best way by any means).  
I start out by giving them each a triangle/pie piece that I've made and copied on the copier (it's 1/8th of a circle that will fit on a 12 x 18" paper).  Using compasses (I ordered new safety ones that I LOVE), students mark four lines, two close to the point and two further away.  The then draw two lines connecting the marks they made and one shape, like this:

On this one, you can easily see the compass marks
on the lower line.
Or like this:


In the photo above, you can see the next step: cutting along the sides and leaving an edge along the top.  I'm so serious that they follow these directions, that if they cut the top off I make them start over [which I never do, so they're shocked when I recycle it and have them start over].  Then they choose an oil pastel to color the back:


It's important that they color a nice, thick layer, because this is their pattern for tracing:


It's very important that they start on the edge of the paper, or they might not have enough room.  Trace once (being sure to trace that upper line/top of the circle), move it and match up the lines, trace again, move . . . They can trace about three times before they have to re-color the back of their triangle with oil pastel.


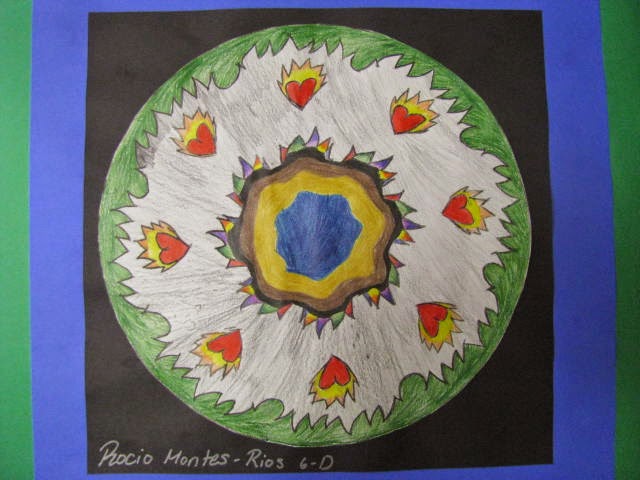
After the tracing's done, they start coloring it symmetrically with watercolor pencils:


Confession: I use watercolor pencils because some color so slowly (or are so busy being social sixth graders) and some are so fast.  Watercolor pencils level the playing field a bit with the "add water" step (some get to it, some don't).  Here are a few "in process" mandalas:

They were allowed to add things for interest with
the watercolor pencils as long as they stayed symmetrical.


A close-up of her value shading.
When most students were done coloring (and I was gone, so a substitute was there) they cut them out and glued them to black.  A few got glued to more paper for display in our offices (we have three) or libraries (we have two).


For me and my students, this is just a good successful-for-everyone lesson that also reinforces some math concepts and teaches them a bit about another culture. 
Teach on, friends, the end of the year is so close now!

Wednesday, April 22, 2015

My Four Year Old Refuses To Wear Jeans

My day started out with a tantrum over jeans.  HOW can a four year old who's too sleepy to dress herself feel denim sliding over her ankles?  Anyway, she refused to wear jeans.  And then I had a tantrum, because I hate being late. I hate feeling like I might even sort of be late, it starts my day at school off in a way I do not enjoy. Thank goodness for husbands who dress tantrumy-non-jeans-wearing children.
Then I got to school and saw this:


Yes. YES. YES!!! For eight years, colored pencils in my room lived here:


See the tape? That was to try to stop the colored pencils from falling out the holes, but it didn't really work and kids were getting scratched and cut by the shards of plastic.  I've looked for replacements for these containers for the past several years.  I finally found shelf files at United Art and Education. While I haven't used them with students yet, the plastic is nice and thick, and I think they'll really work great!


They're wide enough for several students to reach in at once, and deep enough to hold lots of pencils.  Quite an upgrade from recycled Laffy Taffy containers:


I was also grateful for bits of masking tape today:

Masking tape marking 3", 6", 9", 12" and 18" on my paper cutter.
My paper cutter is kind of wonky (aren't most?!) and all cutting (if one doesn't want tearing) has to be done near the edge.  One of my student teachers a few years ago put a piece of tape at the 12" mark.  Genius!  I added the others to help with all sort of cutting.  I even have one at 18".  Here's a close-up:


So after all these little Nerd Art Teacher Things that make me happy, I'll leave work to go pick up my non-jeans-wearer.


Friday, April 17, 2015

Art Show 2015--SUCCESS!!!

I think all art teachers feel this tremendous relief when the art show is over.  Ours was a rockin' good one this year.  Here's a few shots of the hallway displays:

Sixth grade work

First grade work

Kindergarten work

We only had two tables of ceramic work on display this year (all sixth grade):


I also added some "MAKE ART" tables this year for my 3rd-6th graders. But I couldn't get ONE sixth grader to sign up, so we only had three stations (third, fourth and fifth).  Third graders showed art show patrons how to make paper bracelets, fourth graders led them through making a self portrait, and fifth graders helped them make mini sketchbooks:


And I'll close with a few more hallway shots because I'm too tired to form coherent thoughts for blogging this morning (you should all feel a bit sorry for my students today, because the struggle is so real for me to be "on it" on the day after the art show).

First grade work

Fourth grade work

Keep pressing on, art teachin' friends, the end of the year is in sight!

Wednesday, April 15, 2015

Don't Forget to Brush Your Teeth, Kindergarten!


This adorable lesson is one I'd forgotten about.  I was at a conference (don't most of my lessons/posts/ideas start out this way?!) and saw another teacher's lesson where she had young children draw very large, I just added the hand and toothbrush.

We started out looking at ourselves in mirrors and drew with pencil.  We made our "brushing our teeth" face and tried to look closely at all our teeth (or the spaces where our teeth were before they fell out).  After drawing, students traced with Sharpie and colored with crayon, trying to make the best, most realistic colors they could.  


Next we chose construction paper the closest to our skin color (I'd cut them to a 6" x 9" size).  Using pencil, students traced ONE of their hands and cut them out.  Then they glued them hanging loose from their papers:

This is a super-strange shot of hands glued
(each paper has ONE hand glued hanging down,
though it totally doesn't look like it here).
Finally, I led them through making a toothbrush.  Students chose one color of 9" x 12" construction paper, folded it long and skinny, glued it and folded it skinnier and glued it.  To make the toothbrush handle, I had them hold their hand at one end and draw two little lines to cut on.  They folded the handle part in thirds (and glued it) leaving a larger "head" for the bristles:

This one's a little too big, but you get the idea.

We used paper straws for the bristles, cutting them (and watching them jump all over the place), folding little "baby feet" and gluing them on:


The hardest part of the whole thing was figuring how to glue the toothbrush on the hand in a realistic way.


Ideally, the toothbrushes are left a little loose so we can brush our teeth by moving it back and forth and saying "I'm brushing my teeth! I'm brushing my teeth!"


While this is a great lesson for talking about oral hygiene, I did tell my kindergartners they can't brush their paper teeth and tell Mom or Dad "yes, I did brush my teeth!"

Thursday, April 9, 2015

Art Show Excitement is Building, and Thinking of Moms

We've been busily making art show invitations:


This is always the time I know, without a doubt, that I could never be one of those teachers who teaches the same thing class after class, day after day.  Mind numbingly boring.

We've also been working on a Mother's Day gift in adaptive art:


It's a brooch made with tagboard, colored glass, black Cloud Clay and a safety pin thingy:


We put them in papier mache boxes that we (the other art teacher in my building and myself) ordered.  Just some tissue paper with watered down glue and a paper flower on top.  Adorable!  I want one!


Here's the break down: we had students draw a shape on a 3 x 3 piece of tagboard and cut it out.  We then used regular old Elmers glue to glue colored smooth-edged glass (that we ordered from somewhere--Dick Blick, maybe?), making sure to leave space between each stone.  We let them dry overnight (we see each group a week at a time which is also why we're starting Mother's Day gifts in the middle of April) and pressed black Cloud Clay in the spaces (for grout).  We then worked on our boxes while I hot glued the pins to the back.


I sure would wear that sucker PROUDLY. (Confession: I was totally wearing a couple around this morning to "try them out" and "make sure the glue would hold") I hope their moms love them as much as I do.
Pin It