Friday, February 27, 2015

Sometimes Things Turn Out Like This

You just never know, you know?  This is a lesson I haven't done in ages, and it was actually a lesson I used to with second grade, but I sort of forgot and started it with first and it's so very perfect for them:

It's such an amazing drawing!
We start out with looking at Albrecht Durer's Rhinoceros, looking at all his amazing implied textures.  I also pulled a few more drawings off the internet of animals, (showing texture, of course).  Students drew animals on 12 x 18 white paper with pencil and traced with black Sharpie.  

Giant fish with scales.

I love this flamingo.

The next time they came we reviewed warm and cool colors and outlined our animals with marker:

Just starting out with cool colors.

Just starting out with warm colors.

This is a parrot, by the way, surrounded with cool colors.

A turtle with warm colors. Not so sure he really got the texture concept,
but we'll re-visit it again.

Mr. Yak with his warm colors.  We may do another half art period
on these for finishing touches.

There were some tears (the weather's wild here, and it was crazy town today with student behaviors) "I'm not finished!!!" "I wanna take mine home NOW!" The work is so great I'm willing to stand through the random crying and bask in the greatness of it all.

Friday, February 20, 2015

This Is Not My Hat

What art teacher doesn't love a great book to tie into a lesson?  Particularly with the younger ones.  I was introduced to this book through a colleague and had to use it with something. And don't all fish look even cuter with hats?


I started my kindergartners out with patterns/tracers, which I know some art teachers are totally against.  Not me.  I say, if it helps, use it (just like bumpers in bowling, but that's a whole other post).  Using 9 x 12 paper, students folded them (like a greeting card) and traced 6 x 9 fish patterns, making sure to touch every side.  If they did it correctly, when they cut it out they had two fish stuck together. Next we painted one of our fish primary colors:


[I neglected to say that I pre-wrote students' names on their papers so that when they traced and cut out their fish, their names were still there.]
Next students painted the other fish secondary colors, and when they were all nice and dry, I glued them to a piece of yarn in table groups:


Three to four fish were on each piece of yarn.

When students returned to class, I read This Is Not My Hat to them (the stealing really makes kindergartners gasp, which is only adorable).  They then used neutral colors of paper and some leftover "fun" paper to make hats:


And used construction paper to make long plants to "hide" their fish and their hats:


Then I hung them all up outside our library:


And the view from inside the library looking out:


I'm going to have them make some more plants  to "hide" our fish, but until then the students and I will enjoy the compliments rolling in.

Thursday, February 12, 2015

Third Grade Thursday Super Bling!

Sometimes I do things purely for my own amusement, like have third graders make some serious bling:


It's all related to my Egypt unit, and this that I found in the back of my cabinet:


Which after a google/Amazon review I found out isn't made in the turquoise color anymore and right on the package it says not to mix while eating, drinking or smoking, which means it was probably printed in, what, 1983????  
Egypt paste comes as a powder that you mix with water.  After making something with it, you let it dry and fire to cone 06, and it self-glazes.  Sounds great, except--not easy to mix.  If I do it again, I'd mix it a week or so in advance, because the consistency of it was much better after a few days.
I had borrowed some molds from the art museum, so I had my third graders squish some into the molds (and immediately wash their hands).


I learned after a few times to pop them out before they dried for less breakage:


When I fired them I was AMAZED that it actually worked! The top shelf was all shiny and turquoise and wonderful . . . not so much for the bottom shelf, where some of them only glazed on the bottom (?!) Not sure why that happened, but I had more than enough for our rings:


To make the rings themselves, I made around 90 elastic circles and glued small wooden circles (that I had bought in a mixed bag for another project, this was the size too small for the other project) to them:


Then I gave each student a square (about 1.5" x 2-3") of gold sticker paper that came in a remnant box (if you've never ordered a remnant box, you totally should, they're awesome!).  I had them fold their gold papers in half, gold to the inside, draw a large shape with Sharpie (I told them to touch every side, but you know if you're experienced that only about half followed that direction), cut it out, peel the backing and stick them together.  I then hot glued their shape to the elastic they chose that fit them (there was a variety of sizes), and hot glued the [fired] Egypt paste amulet to the ring.  Students then got two glitter glues to add even more shiny:

I used apple shipping trays for them to dry--
had the students write their name on the tray.

Glitter glue takes FOREVER to dry (or overnight, depending on your viewpoint).
This project really does fulfill some curriculum/state requirements (like making a wearable piece of art or jewelry), but I do love me some 8 or 9 year old with huge honkin' blingy rings!

Wednesday, February 4, 2015

Some Beautiful Stained "Glass" on a Dreary Day

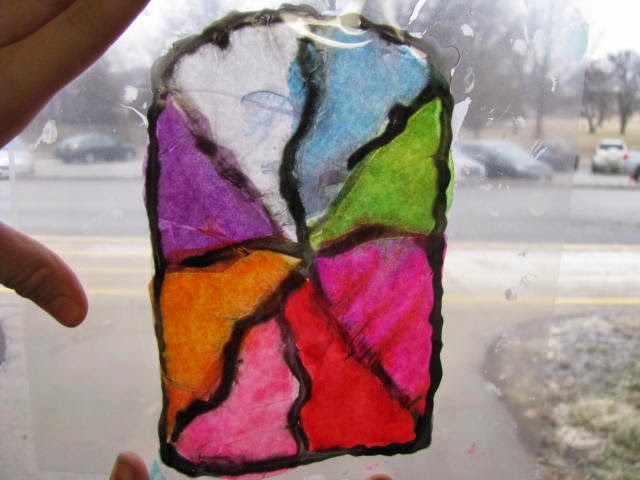
Nothing like those days at school waiting for the snow to arrive; it's starting now.  An hour and a half of the school day left while the weather's only going to get worse instead of better.  To brighten this gray and dreary day, I thought I'd share the stained "glass" my fifth graders have been working on. I did get this awesome lesson from my friend Jeanette, who teaches at a district near to mine and presented this lesson at a conference several years ago.  


This year I related them to Lorenzo Ghiberti, but they can go along with any stained glass artist. I gave them a template (on paper) and had them create a design with lines.  The lines had to touch the sides (not just a shape floating in the middle).  I had our copy clerk (we have two, who knew it was a real thing???) save extra bits of lamination and cut them bigger than the paper I gave them.  It is important to have them write their names on the lamination film with permanent marker, otherwise you have to match them to the design, and ain't no one got time for that! They then carefully trace their design with black glue (their paper design laying under their lamination):


This one may be difficult when she goes on to the next step
because she has those "floating" shapes.  Kind of annoyed with myself for
not catching it as she was working on it.
Tracing with the black glue didn't take the whole class time, so I had them color their paper design with marker when they turned their glue line into me.


The final step was to use watered down glue and tissue paper (not the color bleeding kind) to add the stained "glass" part.  It is vital that their pieces of tissue paper go from one black line to another, being sure to overlap the black line.  I had them use sponge brushes, working a section at a time: watered down glue, tissue paper, more glue (around three layers). 

Held up to the window by a fifth grader helper/hand model.

Hers is so bright and vivid because she layered the same colors over each other.

And and example of someone who just added random colors
until they made "mud."
I sent this class' work home today still on the lamination.  When they get home with them they are to peel them off the lamination (they're so pretty and shiny on that side that was stuck down), tape them to a window and enjoy.


Friday, January 30, 2015

Well, That Was Downright Terrible

I had this great idea to combine printmaking and radial symmetry with third grade.  We were talking about Stonehenge, and I have this marker/crayon symmetry lesson that I've done forever, and everyone's successful with it (but for some reason I've never blogged about it).  Because I was tired of it, I decided to branch out and try something new.  It flopped.  Big time.  Here's my example, that I did step-by-step in front of my third graders:


We used leftover 3" x 3" styrofoam and markers on 9"x9" paper.  And this is the work my third graders produced:


I tried so many different suggestions and techniques, and they really didn't get any better:


This is one that I had to put back in the drawer and take a break from.  We're using the Egypt kit from the art museum right now and experimenting with Egypt paste that looks like it's from the year 1980 (more on that to come).  I shared the horrendousness of this marker symmetry printmaking lesson gone wrong with another art teacher and we both agree maybe they'd be ok (but not fabulous) as a background for something.  I've got some ideas, and if/when we get back to them I'll post an update.
Art teacher on, friends.

Tuesday, January 27, 2015

Let's Make a Try for the Gates of Paradise, Shall We?

I teach three fifth grade classes.  Two at my "home" school and one at a different school in my district.  The three classes are not always at the same point (in the curriculum) at the same time, although I try to keep them in the same general theme.  I introduced four artists to my second school group (and I'll do it soon to my own school groups).  We learned about and took notes on Lorenzo Ghiberti, Leonardo da Vinci, Henri Matisse and Marc Chagall.  The students at my second school really wanted to learn all about Leonardo, which isn't someone I usually cover because I feel like he's so well known, just google him or something.  But anyway, I gave them info on all four artists and used a quick-and-easy Smart Notebook file that you can get here.  Download the file named "daVinci Ghiberti Matisse Chagall." It's really just one slide per artist with examples of their work and a short video if I could find one.  Warning: the Leonardo video has some full-frontal male nudity via the vitruvian man.  So we spent a day learning and taking notes, and then we made our own versions of Ghiberti's "The Sacrifice of Isaac" that won him the doors commission.  I focused on Ghiberti's "The Gates of Paradise" for this lesson.


Although it's kind of hard to tell from the photos, we used the copper-colored metal tooling and gold brads to attach them to black paper.  I started by giving them a square piece of manilla paper (I think it was 6 x 6) and having them fold it twice (into a smaller square) and drawing a line like this:


After I checked to make sure it was in the right place, they cut it out so they had the correct shape and drew things important to them with pencil:

Her family, including the dog, is important to her, SO SWEET!

This boy really, really, REALLY loves the Beatles.
He tries to incorporate them into every single lesson.

They then put these papers on top of the metal tooling that was on a folded piece of felt (to make some pillow-type squishiness) and traced it with a wooden stylus.


I haven't had a chance to hang them up yet, but I am very happy with how they turned out.


Because I only had enough metal tooling for my class at the "other" school, my students at my regular school will be making stained glass windows with a lesson I learned from my friend Jeanette at conference several years ago.  Fifth graders at both schools will make mini art journals so they can draw all the time like da Vinci, and I'm going to suffer through one point perspective with both groups, then I have some lessons planned (collage for Matisse and a math/art lesson for Chagall).  It seems I'll be posting new fifth grade lessons for a while!
Pin It